
Five different searches arrive at the same six seconds of video. "Image to Video AI Generator" names the tool. "AI Video Generator" names the category. "Photo to Video AI" is the phrasing people used before the models got good. "AI Image to Video" describes the pipeline. "Animate Photo with AI" describes what the user actually wants to see happen on screen. All five are asking a single question: can I take a picture I already have, and get back a clip where the subject still looks like itself?
The answer depends less on which site you open than on two decisions you make before you open it. Which frame you feed in, and how much you ask it to do. Everything else — model choice, duration, credits — is a purchase decision sitting downstream of those two.
This is the how-to for both decisions, written against Z Video, a browser workspace at z-video.co that puts four flagship video renderers behind one upload tile. We read the homepage, the pricing page, the showcases page and the image tab on November 5, 2026. We did not buy a render, so anything below about wait time, mouth movement or a finished file is the site's own description rather than a clip we paid for. Prices and model rosters move. If this article and the number on the Generate button disagree, the button is attached to your account and this article is not.
Quick answer: Put one sharp, well-lit photo with one unambiguous subject in the upload tile. Write a prompt that describes only how the shot moves — one camera behaviour, one subject action, nothing that re-describes the picture. Draft on the cheapest renderer at the shortest length, watch the whole clip for identity drift, then re-render the take you like on a better model or a longer duration. On Z Video that draft costs 40 to 80 credits and a final costs 150 to 700, so the order of operations is the budget.
The Five Keywords Are One Job, Described Five Ways
The vocabulary is worth untangling because it changes what you should expect to receive.
Image to Video AI Generator is a product noun. It promises a tool where an image is an input and a video is an output. That is the smallest useful definition, and it is the one this article works from.
AI Video Generator is the genus, not the species. A video generator can be text-only. Text-to-video starts from nothing but words and invents the subject, the room, the light and the face. Image-to-video starts from pixels you supplied and is not allowed to reinvent them. The two modes live in the same products and behave nothing alike, which is why a demo that impressed you on a text prompt can disappoint you on your own portrait.
Photo to Video AI and AI Image to Video are the same job under two names, one consumer-flavoured and one technical. Nothing turns on which phrase you type.
Animate Photo with AI is the outcome phrase, and it hides a fork. People who say it usually want one of two results. Keep the photo as frame one: same face, same clothes, same room, add motion. Or use the photo as a reference: keep the person recognisable but put them somewhere new. These are different products wearing similar clothes, and a prompt that tries to satisfy both tends to fail at both — the model either drifts away from the original look or freezes the background while inventing a scene that contradicts it.
The distinction has a second consequence that matters commercially. An image to video AI generator that honours frame one is a production tool: it preserves an approved packshot, a signed-off key visual, a spokesperson's real face. A generator that treats the photo as a loose reference is a concept tool. If your brief is "the same bottle, but moving", only the first kind of tool can deliver it, and no amount of prompt engineering converts the second into the first.
Z Video's own page draws the same line from the other side. Its FAQ says the photo "becomes the opening frame, and the model extends it forward in time according to your motion brief", and that because the subject, product and lighting are supplied rather than imagined, the clip stays anchored to what you uploaded. That is a frames-style promise. If what you want is a new scene, the AI Image tab is where you build the new frame first, and the video tab is where you animate the result.
Why Frame One Changes the Math
A useful mental model of an image-to-video model has five stages. It encodes the still — subject, composition, colour, light, style. It builds a latent plan for a run of future frames. It conditions that plan on your text. It denoises through space and time until consecutive frames agree with each other. Then it decodes to video, and on some models to audio in the same pass.
What matters for a user is that four goals are being optimised at once and they compete: preserve identity, infer plausible motion, keep frames temporally coherent, and follow your prompt. When a clip breaks, one of those goals won at the expense of the others. A face that melts at second four is identity losing to motion. A shot where nothing moves is coherence winning against your instruction. A clip that wanders off and does something beautiful but unrelated is prompt adherence beating the frame.
That is the whole theory you need, and it explains the practical rules that follow. Motion amplifies whatever is already wrong with the source. A soft focus becomes a smear, because the model has to make up detail it can't resolve, and it makes up different detail in every frame. A busy background becomes a crawl, because the camera can't find a fixed reference. A hand with fingers cut off at the frame edge gets redrawn, and it is exactly there that the sixth finger appears.
Runway's image-to-video guidance puts the same point more bluntly: the prompt's job is narrower than it sounds. Describe what should happen next — motion, camera work, temporal progression — not the scene, because the reference frame already established it. Re-describing the picture wastes the brief and muddles the result. Our own worked example on animating two photos ran into the same wall from a different direction: a generator that fixes the scene for you removes the prompt problem, and a generator that leaves the scene open hands it back.
The Seven-Point Source Check
This is the part that decides whether the render is usable, and it is the part almost nobody slows down for. Run every photo through these before you spend a credit.
1. Sharpness at the size you will publish. A 1080p landscape frame is 1920 by 1080 pixels. If you intend a 1080p deliverable, the source should be at least that big in the same shape, and genuinely sharp rather than upscaled mush. A phone screenshot of a photo is not a photo. Z Video's own advice is that soft focus smears and compression artefacts crawl, and that if the source needs work, the image tab is where to upscale it or clear the background before spending on motion.
2. One unambiguous subject. Group photos are the single most common cause of a bad render. The model has to decide who is moving, and given several plausible candidates it may blend features. Crop one person or one product per file. If two people genuinely need to be in the shot, they both need to be clearly separated in the frame, not overlapping at the shoulder.
3. A face you can actually read. Front-facing or a slight three-quarter turn, both eyes visible, nothing crossing the cheek — no sunglasses, no hair curtain, no phone held up. Eyes animate most naturally when they are legible at thumbnail size. Shadow across half the face is worse than flat, boring daylight.
4. Hands either fully in frame or fully out. A hand cropped at the edge is a redraw waiting to happen. If the shot doesn't need hands, frame them out. If it does, give them a stable resting position rather than a gesture mid-air.
5. A background that will hold still. Simple backgrounds animate cleanly. Dense patterns, repeated structures, crowds and small text drift frame to frame, and once they drift the eye reads the whole clip as unstable even if the subject is perfect.
6. The right aspect ratio, before upload. Compose in the shape you will publish. A frame composed for 16:9 loses its subject when cropped to 9:16, and every renderer on Z Video offers both, so there is no reason to fix it later. Decide the delivery format first, then pick the photo.
7. Room to move, and a pose already in motion. If the subject will walk right, they belong in the left third with open road ahead. If the camera will push in, frame a little wider than the final composition so the push has somewhere to land. A weight shift, a hand reaching for a cup, hair caught by wind — any of these tells the model which way the motion is already going. A stiff, dead-centre pose gives it no cue and it has to guess.
| What the photo contains | What the model tends to change | What to put in the prompt |
|---|---|---|
| A face | Eyes, teeth, jawline, apparent age | Preserve identity, facial proportions, skin texture, hairstyle |
| A product label | Lettering, logo, packaging edges | Keep the label and logo unchanged and readable |
| In-frame text | Characters, spacing, dates | Keep all text static and unchanged |
| A room | Wall lines, window frames, furniture placement | Room layout and straight lines unchanged |
| Hands | Finger count, joint shape | Frame hands out, or keep them still |
| A background crowd | Faces, clothing, crowd density | Background calm and stable, no new people |
Write the Motion, Not the Scene
The prompt template that carries most of the work is four clauses long:
[one camera behaviour] + [one subject action] + [optional environmental motion] + [what must not change]Weak: "Beautiful woman in a stylish coat standing on a street, cinematic, dynamic, 4K, masterpiece."
Strong: "Slow push-in toward the subject as she turns her head toward the camera and smiles once. Coat hem lifts slightly in the breeze. Background stays calm and the camera settles after the push completes."
The weak version fails for a specific reason, not a mysterious one. It spends its words re-describing what the model can already see, and it asks for two adjectives — cinematic, dynamic — that are not instructions. The strong version names one camera move, one subject action, one environmental detail and one constraint, and it tells the camera what to do when the move finishes.
Here is the same discipline applied to prompts the site publishes itself. The homepage's prompt library prints the prompt under each clip along with the start photo it came from, which makes it the most directly reusable thing on the page. Three of them, verbatim:
Beach sunset run — "The golden retriever runs from the left third of the frame toward the right while the camera tracks alongside at ground level; waves roll in and water splashes up from its paws in the golden sunset light."
Rooftop cheers — "The camera slowly orbits a quarter turn around the group from left to right as the friends raise their glasses and clink them together, string lights twinkling and the skyline shifting behind them."
Weekend brunch flat lay — "Top-down shot: the camera slowly rotates clockwise and pushes in toward the pancakes as a hand enters from the right edge and pours maple syrup over the stack."
Read those three and the pattern is obvious. Each has exactly one camera behaviour — track, orbit, rotate-and-push. Each has one subject action — run, raise glasses, pour. Each has one piece of scene life — waves, string lights, steam. None of them describes what colour the dog is.
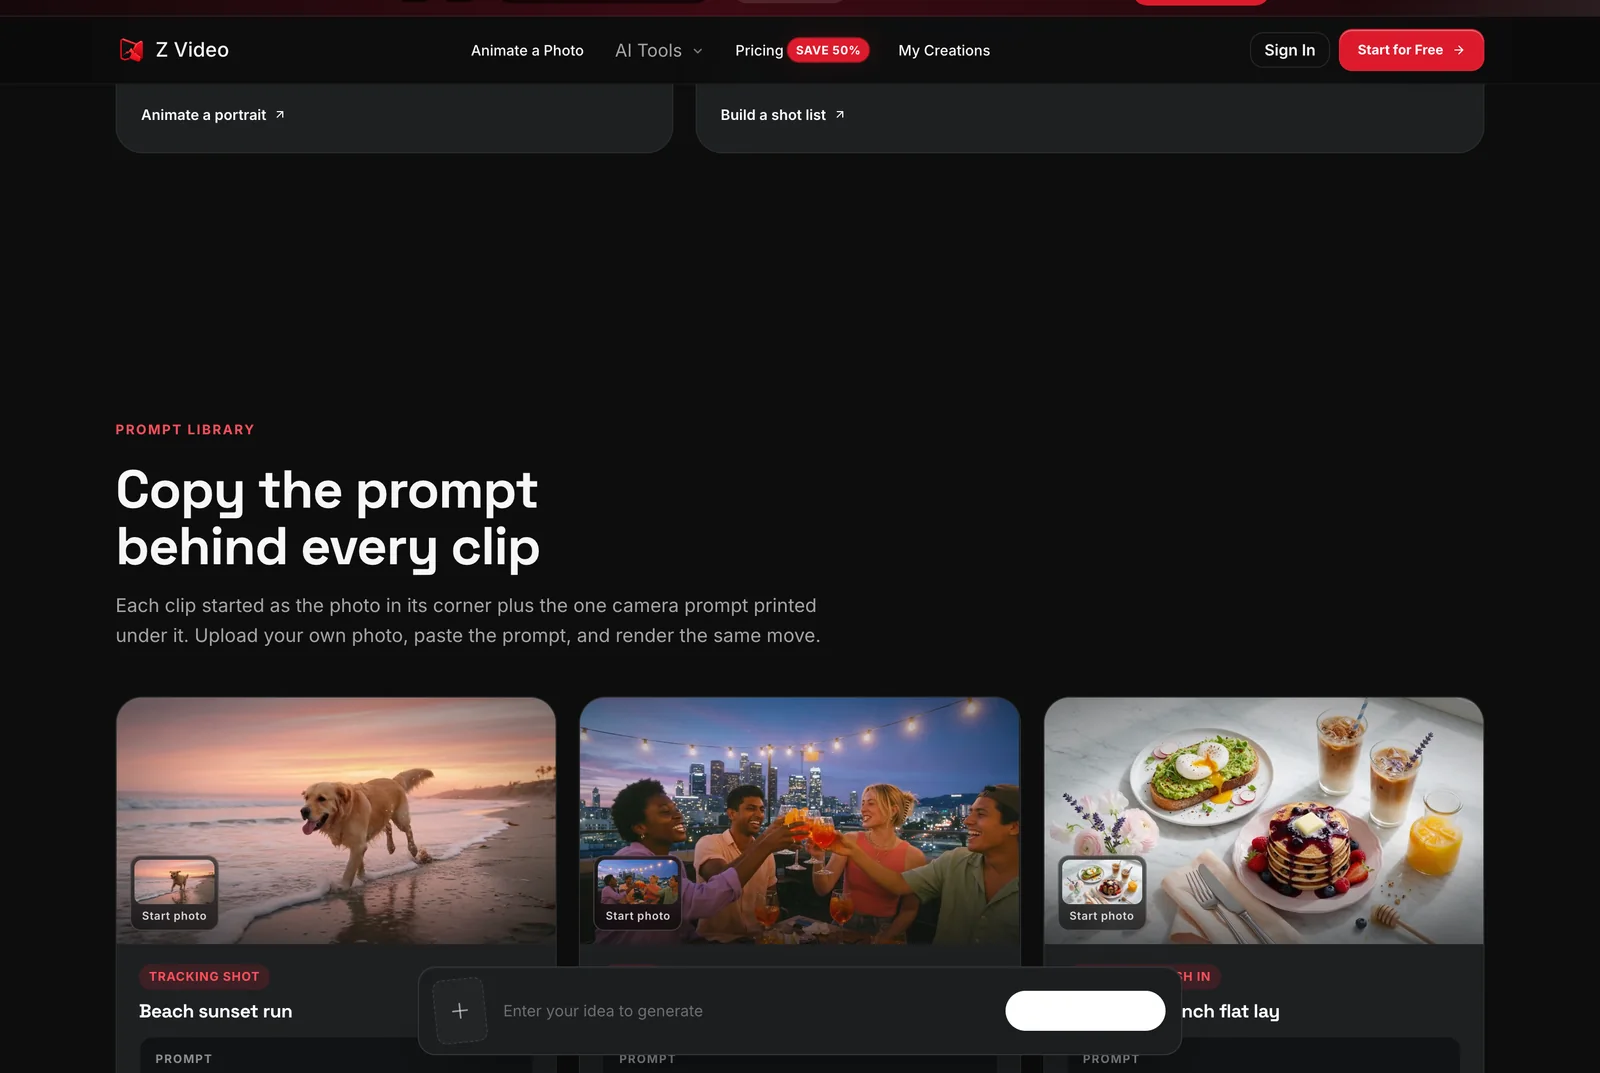
The prompt library on z-video.co, captured November 5, 2026. Every card pairs the source still with the exact prompt that produced the clip, which is a faster way to learn camera vocabulary than reading a prompt guide.
Which Renderer to Reach For
Z Video runs four models behind one upload tile, and they are not interchangeable. The differences that matter are length, resolution and whether sound arrives with the picture.
| Renderer | Length | Output | Audio | Credits |
|---|---|---|---|---|
| Veo 3.1 Fast | 8 seconds | 16:9 or 9:16 | Generated with the picture | 80 |
| Veo 3.1 Quality | 8 seconds | 16:9 or 9:16 | Generated with the picture | 700 |
| Sora 2 | 10 or 15 seconds | 16:9 or 9:16 | Native, physics-aware motion | 150 for 10s, 250 for 15s |
| Seedance 2.0 | 4, 8 or 12 seconds | 480p, 720p or 1080p | Picture only | from 40 |
The practical reading of that table is a two-pass workflow, and the site says as much on both its homepage and its pricing page. Veo 3.1 Fast is the cheap look at whether your framing and your motion brief work at all. Veo 3.1 Quality is the same eight seconds rendered for delivery, at nearly nine times the price — which makes it a finishing pass, not a first attempt. Seedance 2.0 is the flexible one: it is the only renderer where you choose resolution independently, so it covers both the cheapest test on the page and a 1080p twelve-second cut. Sora 2 is the long take, and the one to reach for when the shot depends on objects behaving like objects.
There is an upstream footnote worth knowing before you trust any label in any dropdown, this one included. Google's own documentation puts Veo 3.1 at eight seconds maximum with 1080p and 4K requiring that full eight, which matches what the workspace sells. OpenAI's deprecation table, by contrast, dates the Sora 2 API and every sora-2 and sora-2-pro snapshot to a September 24, 2026 shutdown with no recommended replacement, so a workspace that still lists Sora 2 is describing a capability rather than a pinned endpoint. That is not a scandal; it is what a credit reseller is, and it is the reason you confirm the model, the length and the live credit cost on the generate button rather than in an article.
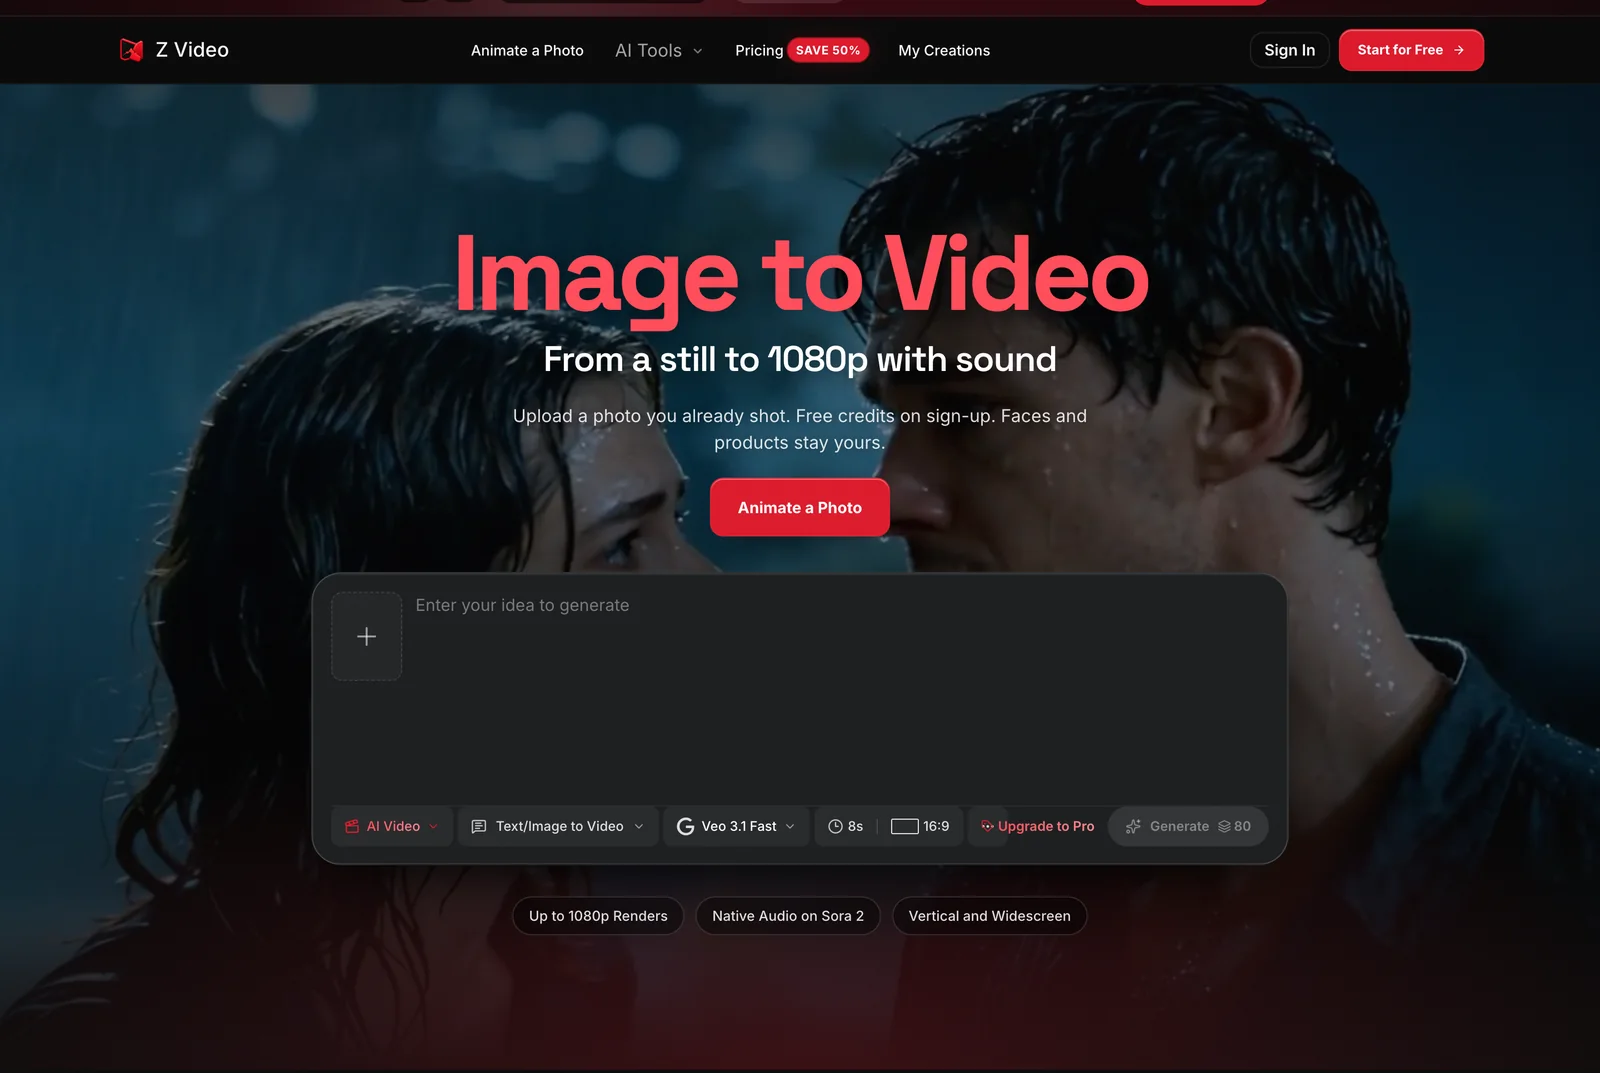
The console on z-video.co, captured November 5, 2026. The Generate button reads "80" because Veo 3.1 Fast at eight seconds is selected — the number recalculates as you change model, length or resolution, and nothing is charged until you press it.
How to Make a Product Packshot Orbit
This is the highest-return use of image-to-video for anyone selling something, because a studio reshoot costs a day and this costs 40 to 80 credits. It is also the job where the model most often quietly lies about your product, so the workflow has to include a check.
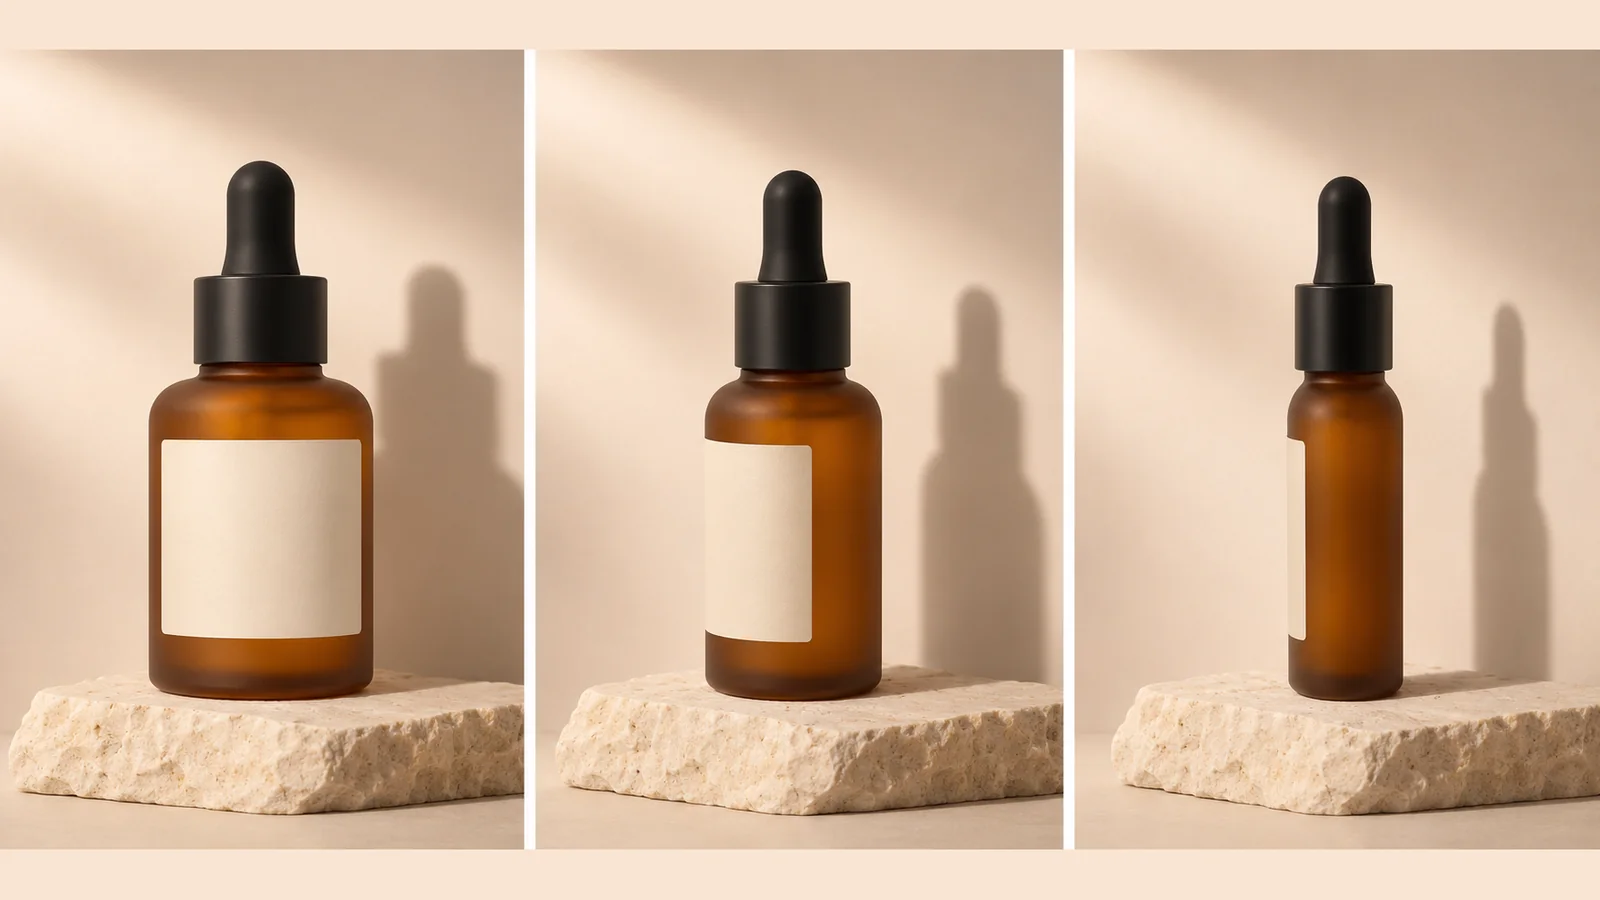
Illustration made for this article with an AI image model. It shows what an orbit brief has to protect — one bottle, one plinth, one light direction and one label position held across three moments of the same shot, which is the property that makes a product clip usable on a listing page. It is not a screenshot and not a render we bought.
Step 1: Photograph the product like a catalogue, not like a mood board. Sharp focus, even light, product filling roughly 70 percent of the frame, label facing camera, nothing crossing the silhouette. Shoot at the highest resolution your phone offers. The model can invent a limestone plinth. It cannot recover lettering you never captured.
Step 2: Settle label legibility before you spend on motion. Small type is the first thing to bend. If the SKU has to be readable in the finished clip, either shoot it large enough that the letters occupy real pixels, or accept that the clip is for atmosphere and the still on the listing page carries the type. Fixing a bent label afterwards is a retouch job, not a re-render.
Step 3: One camera move per clip. An orbit is one move. An orbit that becomes a push-in that becomes a tilt is three moves in eight seconds, and the model will resolve the conflict by doing roughly none of them well. Render the orbit. Render the push-in separately. Cut them together in an editor, where you have a cut point and a decision.
Step 4: Say what must not change. "The bottle shape, label position and cap stay identical; only the camera moves" is a sentence worth typing every time. It costs nothing and it names the invariant the model should protect.
Step 5: Draft cheap, then finish. A four-second Seedance clip at 480p is the cheapest render on the page. That is the right way to find out that your plinth shadow is going to crawl. Once the move reads correctly, re-run the same still and the same prompt on Veo 3.1 Quality for the eight seconds you actually ship.
Step 6: Watch the edges, not the centre. The bottle will usually look fine. Look at where the product meets the background, at the shadow under the base, and at the label's left and right edges. Those are the three places drift shows up first.
How to Make a Vertical Social Cut From a Candid
The second high-value job is the opposite of the studio one: you have a snapshot with real texture and you want eight seconds of it, in 9:16, today.
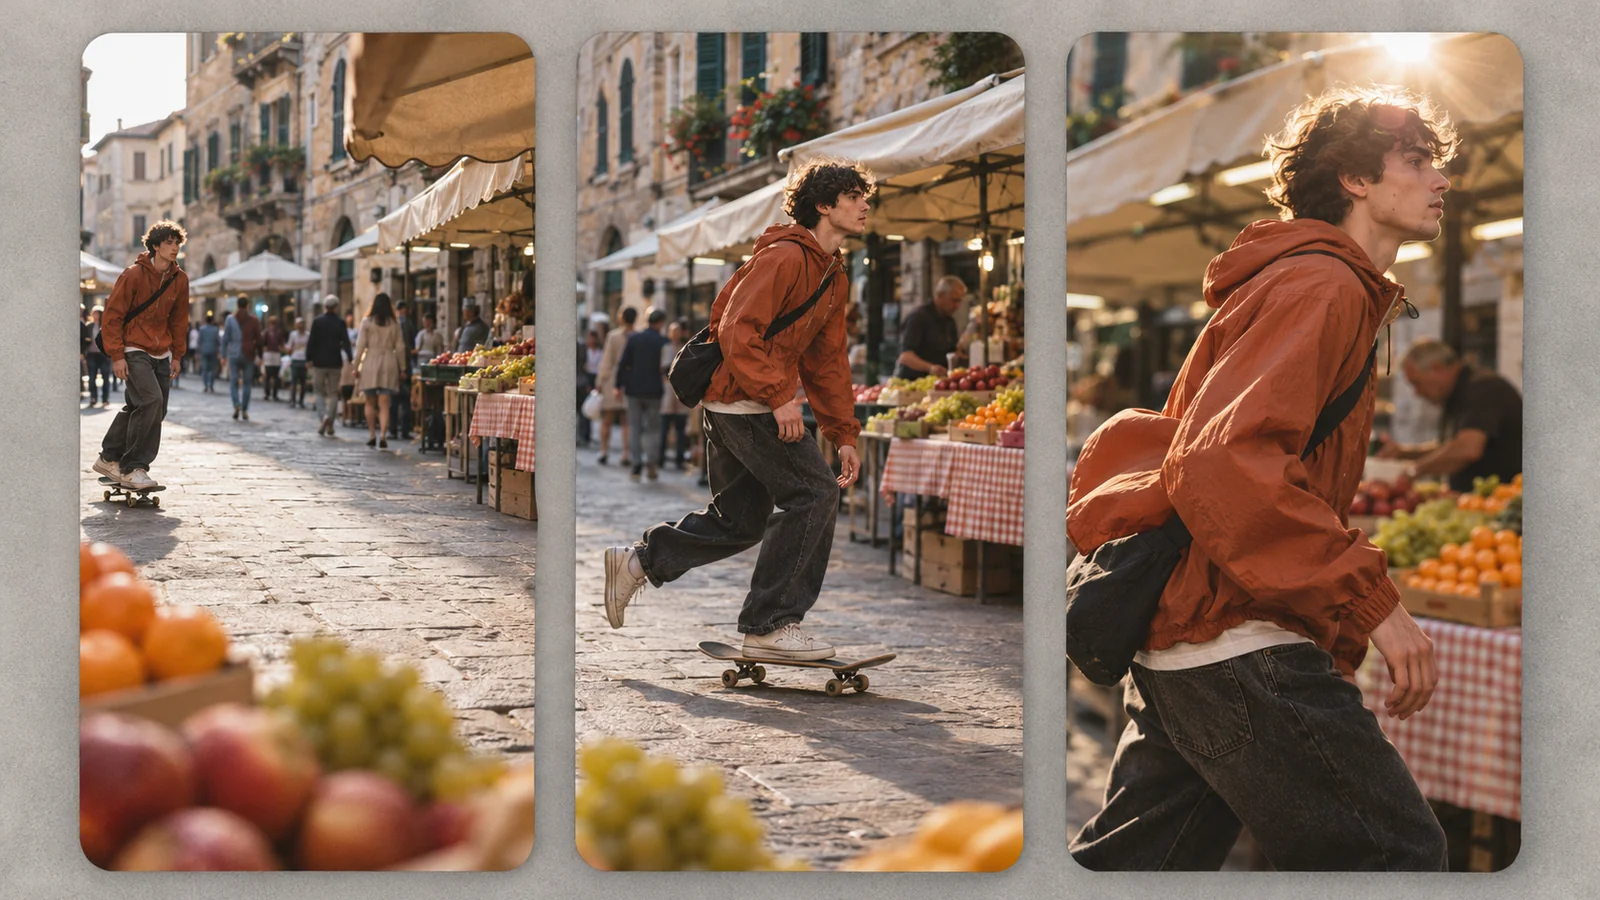
Illustration made for this article with an AI image model. It shows one continuous tracking shot broken into three moments rather than three different shots — the man, the outfit and the market stay fixed while the camera position changes. Not a screenshot, not a customer render.
Pick the frame that already has a story in it. A person mid-stride, a hand reaching, a head turning — these animate. A person standing straight at a camera waiting does not, because there is nothing for the model to continue.
Leave the runway in shot. Whichever direction the subject will travel, they should start on the opposite third. A subject jammed against the edge has nowhere to go but out of frame, and the model will either freeze them or push them off.
Choose 9:16 at upload, not in the editor. All four renderers support vertical. Cropping later costs you either the composition or the resolution, and both are decided before the render.
Draft in eight seconds, deliver in twelve. A Veo 3.1 Fast pass at 80 credits tells you whether the tracking motion reads. If it does and you want more room for the moment, Seedance 2.0 at twelve seconds and 1080p is the delivery file. That is roughly an eight-times jump over its cheapest four-second 480p render, which is why you validate first.
Design for the caption band. Reels and Shorts lay interface over the bottom fifth and often the top. Keep the subject's face out of those bands at the source-frame stage, or you will be re-rendering for a safe area you already knew about.
How to Make a Founder Clip That Still Looks Like Them
Animate photo with AI and the hardest case is always the human face, which is also the most common request — because a real face is the one thing nobody wants the model to improvise.
The failure mode is specific: a large head turn. Ask for a profile that was not in the photo and the model has to invent the back of a head, an ear, a jawline from the side. When the head comes back to camera, the face that returns belongs to someone slightly different. The same thing happens with talking — teeth and lip shapes are where identity most visibly breaks.
So the constraint list for a portrait render is short and strict:
- One primary facial action. A blink, a slow smile, a small head turn toward camera.
- At most one gentle camera move, or a locked-off camera.
- No wide head turns, no 180-degree motion, no talking unless the source supports it.
- Four to eight seconds, not fifteen. Longer clips give drift more time to accumulate.
- A preservation clause naming identity, facial proportions, age, eye shape, skin texture, hairstyle, clothing and background.
- A negative clause naming the failures you refuse: no face morphing, no beauty-filtered skin, no new people, no cuts.
Then review frame by frame rather than at speed. Watch it once normally for feel, then scrub and compare the middle and final frames against the source. Check eye size and direction, nose width, lip shape, jawline, the hairline, the boundary between face and background, and any glasses or jewellery near the cheek. A beautiful opening frame proves nothing. If the person becomes less recognisable as the clip runs, the motion request was too ambitious, and the fix is a smaller ask rather than a bigger prompt.
The site's own copy is honest about this being a design goal with a failure mode: it recommends a sharp front-facing replacement photo when a close-up doesn't look like the person, and notes that the page will not stop you posting a clip whose mouth almost works.
Chaining Clips Into a Sequence
Every renderer here produces a shot, not a scene. Longer sequences are built by rendering several clips and cutting them together, which is what the site says on both the homepage and its FAQ. Three habits make that bearable.
Chain from the cleanest frame, not the last frame. The literal final frame of a clip is usually the least stable one — motion blur, a blink half-finished, a shadow mid-sweep. Pull the cleanest frame from clip one and use it as the start frame of clip two. You get a hard visual anchor for hair, clothing and pose, which is a stronger guarantee of continuity than any prompt.
Keep the settings identical across the chain. Same model, same resolution, same aspect ratio, same length. Every change is a new variable, and a chain with four variables is not a sequence, it is four unrelated clips.
Write each prompt as a continuation, not a reset. Clip two should describe only what changes from the state clip one ended in. If clip two's prompt re-describes the room, the model may decide to rebuild the room.
Once the clips exist, the assembly problem is ordinary editing. Upscale before grading, not after, because detail synthesis and a finished colour pass fight each other. And cut on motion, not on the beat, if the two disagree.
The Decisions That Cost Money
The credit table above is the honest cost of a render. The plan table is where people misjudge the arithmetic, because the marketing line and the render button count different things.
Z Video's paid tiers are Starter at $9.9 a month billed yearly, Pro at $19.9 and Studio at $44.9, with monthly-renewing equivalents at $19.9, $39.9 and $89.9. The credit allowance works out to 800, 2,000 and 6,000 a month either way — annual plans sell it as 9,600, 24,000 and 72,000 credits charged once for the year. Commercial use, watermark-free downloads and 1080p where the model allows are included at every paid tier, so what changes between them is volume, not permission.
Now the trap. The plan cards say things like "about 20 short clips a month, or 80 images", and that number is computed at the cheapest render on the page: 800 credits divided by 40. It is true if every clip you make is a four-second 480p Seedance render. It is not true of the clips most people actually want:
| What you are actually buying | Credits | Clips from an 800-credit month |
|---|---|---|
| Seedance 2.0, 4s, 480p | 40 | 20 |
| Veo 3.1 Fast, 8s, with audio | 80 | 10 |
| Sora 2, 10s | 150 | 5 |
| Sora 2, 15s | 250 | 3 |
| Veo 3.1 Quality, 8s | 700 | 1, with 100 credits left |
Two conclusions follow, and both are good news for anyone who plans. First, the cheap renderer is not a compromise — it is the correct place to spend most of a month's credits, because the expensive renderer cannot fix a bad motion brief, only render it more beautifully. Second, a fifteen-second Sora 2 take costs about three Veo 3.1 Fast drafts and about six Seedance short tests. If you are still exploring, you are paying a premium for length you have not earned yet.
One-time packages sit alongside the subscriptions. Z Video lists a Starter package at $29.9 for 1,000 credits, Growth at $59.9 for 3,000, Professional at $99.9 for 5,500 and Business at $199.9 for 12,000, with a validity window measured in years rather than months. That is the right shape for a project with a deadline and no continuing need, and the wrong shape for a weekly posting habit — a subscription's credits refresh, and a package's do not.
And the image tab is where the cheap work happens: a GPT Image 2 edit is 10 credits, against 40 for the shortest video render. Settling composition, crop, background and cleanup on a still at 10 credits is the single largest saving available in this workflow, and it is the step people skip because it feels like delay.
Rights, Likeness, and the Label
The commercial licence and the right to the photo are two different questions, and neither one answers the other.
A paid Z Video plan carries a commercial-use licence covering advertising, social, ecommerce listings and client delivery — the site states this on its pricing page and its terms carry the full wording, with a caveat that individual model providers may attach their own restrictions. That licence governs the render. It does not give you rights to the image you uploaded.
So the questions to answer before uploading, in order: do I own or licence this photo, and does that licence cover derivative video; if a person is in it, did they agree to appear in an AI-generated clip, and are they an adult; if a product is in it, am I allowed to show that label in a moving ad; and if a child appears, is the platform even the right venue. The site's own guidance is to upload only material you hold rights to and to keep identifiable people out unless you have permission.
Then there is the disclosure question, which is a publishing question rather than a rendering one. All three platforms this content usually ships to ask for a label on realistic synthetic video, and they ask in slightly different words:
- YouTube asks creators to disclose AI-generated or altered content that looks realistic, using the "AI use" setting in Studio during upload. A photorealistic label may also appear on the player. Consistent non-disclosure can carry penalties.
- TikTok requires creators to label wholly generated or significantly edited realistic content, and it also auto-labels uploads carrying C2PA Content Credentials — which, once applied, cannot be removed.
- Instagram and Meta require the AI disclosure for photorealistic AI video and realistic AI audio; AI images generally do not require it, though Meta may apply a label on its own.
The practical version: if you animated a real person's face into a scene they were not in, label it. If your clip could be mistaken for documentation of a real event, label it. The rule that survives all three policies is that a viewer should not have to guess whether the six seconds happened. A watermark-free download makes that discipline the creator's job rather than the file's.
Five Ways a Render Fails, and What to Change
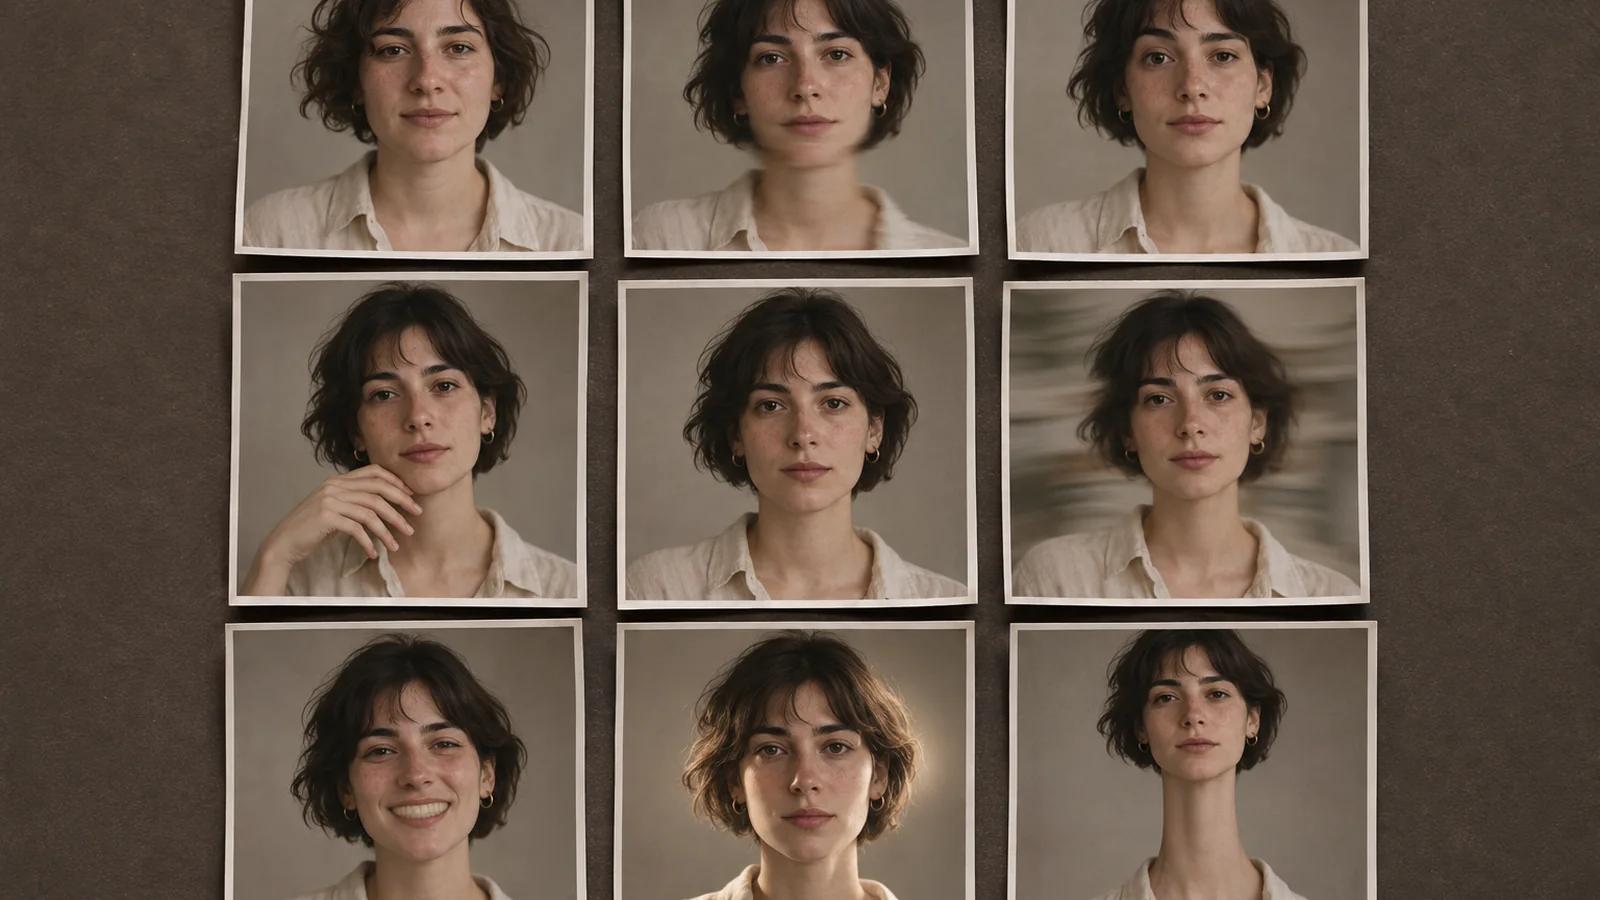
Illustration made for this article with an AI image model. Each frame holds one defect at a time, which is how you should debug a bad render: change one variable between takes rather than rewriting the whole brief. The people are fictional; this is not a screenshot and not a failed customer render.
| Symptom | Real cause | Fix in the next take |
|---|---|---|
| Face slowly becomes someone else | Motion request too ambitious for the source | Shorten the clip, remove the head turn, add the preservation clause |
| Background crawls or boils | Busy pattern near the subject's edge | Simplify or blur the background in the image tab first |
| Subject slides or floats | Pose gave no directional cue | Re-crop so the subject starts on the opposite third, mid-action |
| Sixth finger appears | Hands cropped at the frame edge | Reframe hands fully in, or fully out |
| Nothing much moves | Prompt described the scene, not the motion | Rewrite as one camera behaviour plus one subject action |
None of these need a different model. All five are source-and-prompt problems, which is why the first render should be the cheapest one on the page.
Questions People Ask With the Photo Already Open
Do I need a photo at all? No. Leave the upload tile empty and write the whole scene as text for text-to-video. It is the weaker route whenever an approved key visual, a real product or a recognisable face has to end up in the result, because text-to-video invents the subject and image-to-video does not.
What file types and sizes does the upload take? JPG, PNG and WebP on the image side, with the limit shown beside the uploader. The console prints the accepted formats and the credit cost before anything is queued.
Can I get a silent file? Yes, and on most models you get sound by default rather than by request. Sora 2 and Veo 3.1 generate a soundtrack with the picture; Seedance renders picture only. Mute on export if the deliverable has to be silent.
Is "photo to video AI" a different product from image to video? No. The two phrases describe the same pipeline under a consumer and a technical name, and any tool that accepts a still and returns a clip is doing both. What varies between tools is whether the still is treated as frame one or as a loose reference, and that distinction is the one worth checking before you pay.
How long can one clip be? Eight seconds on both Veo 3.1 tiers, ten or fifteen on Sora 2, and four, eight or twelve on Seedance 2.0. Anything longer is several renders and an edit.
Can I use the same source frame across several clips? That is the most efficient thing you can do with it. Keep the approved still, change only the camera brief, and you get a coherent set of cuts from one piece of artwork — which is exactly what the site's own showcases page describes as the workflow.
What if the first render is bad? Change one variable and re-run. Changing three variables at once means you learn nothing about which one mattered.
Is there a way to check the cost before committing? The Generate button carries the live figure and your remaining balance, recalculated as you change model, length or resolution. Setting a job up costs nothing.
What to Do Tonight
If you take one thing from this article, take the order of operations, because it is the part that survives every model release.
Put one sharp photo with one subject in the tile. Decide 16:9 or 9:16 before you upload. Write four short clauses — one camera behaviour, one subject action, one environmental motion, one preservation constraint. Draft on the cheapest renderer at the shortest length. Watch the whole clip at the size you will post, then watch it again frame by frame. Only when the motion reads correctly do you spend on a better model or a longer cut. Chain further shots from the cleanest frame of the last one, keep the settings identical, and label the result if a viewer could mistake it for something that happened.
That workflow is model-agnostic. It is also why the choice of workspace matters less than the choice of frame: any of the four renderers on Z Video will produce a good clip from a well-designed first frame, and none of them will rescue a bad one. If you want to see what the moves look like before you spend anything, the showcases page is organised around exactly that question, and the pricing page prints the per-render credit costs that the plan cards summarise.
Start with the photo, not the prompt. The prompt is a sentence. The photo is the shot.
Sources Checked on November 5, 2026
Product facts — renderers, durations, resolutions, credit costs, plan tiers, upload advice and the frame-one framing — were read from z-video.co, its pricing page, its showcases page, its AI Image tab and its About page. Model capability statements were cross-checked against Google's Gemini API documentation for Veo 3.1 (8-second output, 16:9 and 9:16, native audio, 1080p requiring eight seconds) and OpenAI's published deprecation table for the Sora 2 API and model snapshots. Prompting guidance on describing motion rather than scene was drawn from Runway's image-to-video prompting documentation, and the frames-versus-reference distinction from published practitioner notes on animating still photographs. AI disclosure requirements were read from YouTube Help, TikTok's AI-generated content guidance, and Meta's disclosure policy pages. We did not purchase a render from Z Video, so no output described here is a clip we generated; illustrations are AI-generated images made for this article and are labelled as such in their captions. Our editorial policy explains how we treat vendor claims we have not reproduced ourselves.