"AI photo editor" used to mean a menu of one-click fixes: remove background, sharpen face, erase object. It now means something stranger and more useful. You upload a photo you already own, describe a change in a sentence, and a model redraws the frame around your subject. No masks. No layers. No pen tool.
This guide is the how-to for that second kind of editing, using MeiGen AI as the working example. The promise is real but conditional: prompt-based edits hold up when you tell the model what to change and what must not move, and they fall apart when you treat the prompt box like a magic wand. We will cover the prompt structure that survives contact with real client work, which model to pick for which job, where your credits actually go, and the specific cases where you should close the tab and open Photoshop instead.
Quick answer: Prompt-based photo editing works by feeding a source image plus a written instruction to an image-editing model. A reliable edit prompt has four lines: the change, the things to keep, the light, and the intended use. On MeiGen AI the same prompt bar handles text-to-image, single-image edits and multi-reference blends, with models ranging from 1 credit (Agnes Image 2.5 Flash) to 88 credits (GPT Image 2.5 at 4K Max) per image. Draft at 1K on a cheap model, then re-render only the keeper at 2K or 4K.
A note on sources: the model lineup, reference limits, resolutions and credit prices below were read from meigenai.co and its documentation on November 4, 2026. Prices and models change; the Generate button always shows the authoritative cost for your settings. We are not MeiGen AI, we do not sell it, and our editorial policy explains how we handle vendor claims we have not independently reproduced.
What "Prompt Based Photo Editing" Actually Means
The phrase gets used for three different products, and mixing them up is the fastest way to waste money.
Semantic whole-frame editing is what image models like GPT Image and Nano Banana do. You give it a photo and an instruction; it produces a new image that reinterprets the whole frame according to your words. The subject is usually preserved because the model was trained to treat the input as a reference, but nothing is pixel-locked. A label that said "30 ml" may come back saying "30 ml" in a slightly different typeface. A jacket's stitching may be redrawn. That is not a bug you can prompt away; it is how the class of model works.
Instruction-based local editing is the masked or region-constrained version. Some tools let you paint a region and only that region is regenerated. This is closer to a traditional retouch, and it is what you want when a client says "change one word on the box."
Generative fill is the third thing: extending canvas, removing an object, or filling a hole. It is technically the same model family applied to a smaller region.
MeiGen AI is firmly in the first category. It is a prompt bar, not a layer stack. Once you accept that, the rest of the workflow makes sense: your job is not to "apply a filter" but to write an instruction precise enough that the redraw lands where you wanted it.
Why the Prompt Bar Replaced the Layer Stack for So Many Jobs
A layered editor is a precision instrument. Every change is explicit, reversible and auditable. That control costs time: masking hair by hand, cloning out a tourist, relighting a product shot — each is a skill, and each takes minutes to hours.
Prompt-based editing trades precision for iteration speed. The economics flip depending on the job:
- Cheap to prompt: new background, new season, new light direction, new setting, new mood, style transfer, "put this product on travertine instead of a desk."
- Expensive to prompt: exact typography, brand color matching, logo fidelity, precise geometry, anything a client will compare side by side with a Pantone chip.
The practical rule: if the change is easier to describe than to execute, prompt it. If it is easier to execute than to describe — "move this 3 px left" — do it by hand.
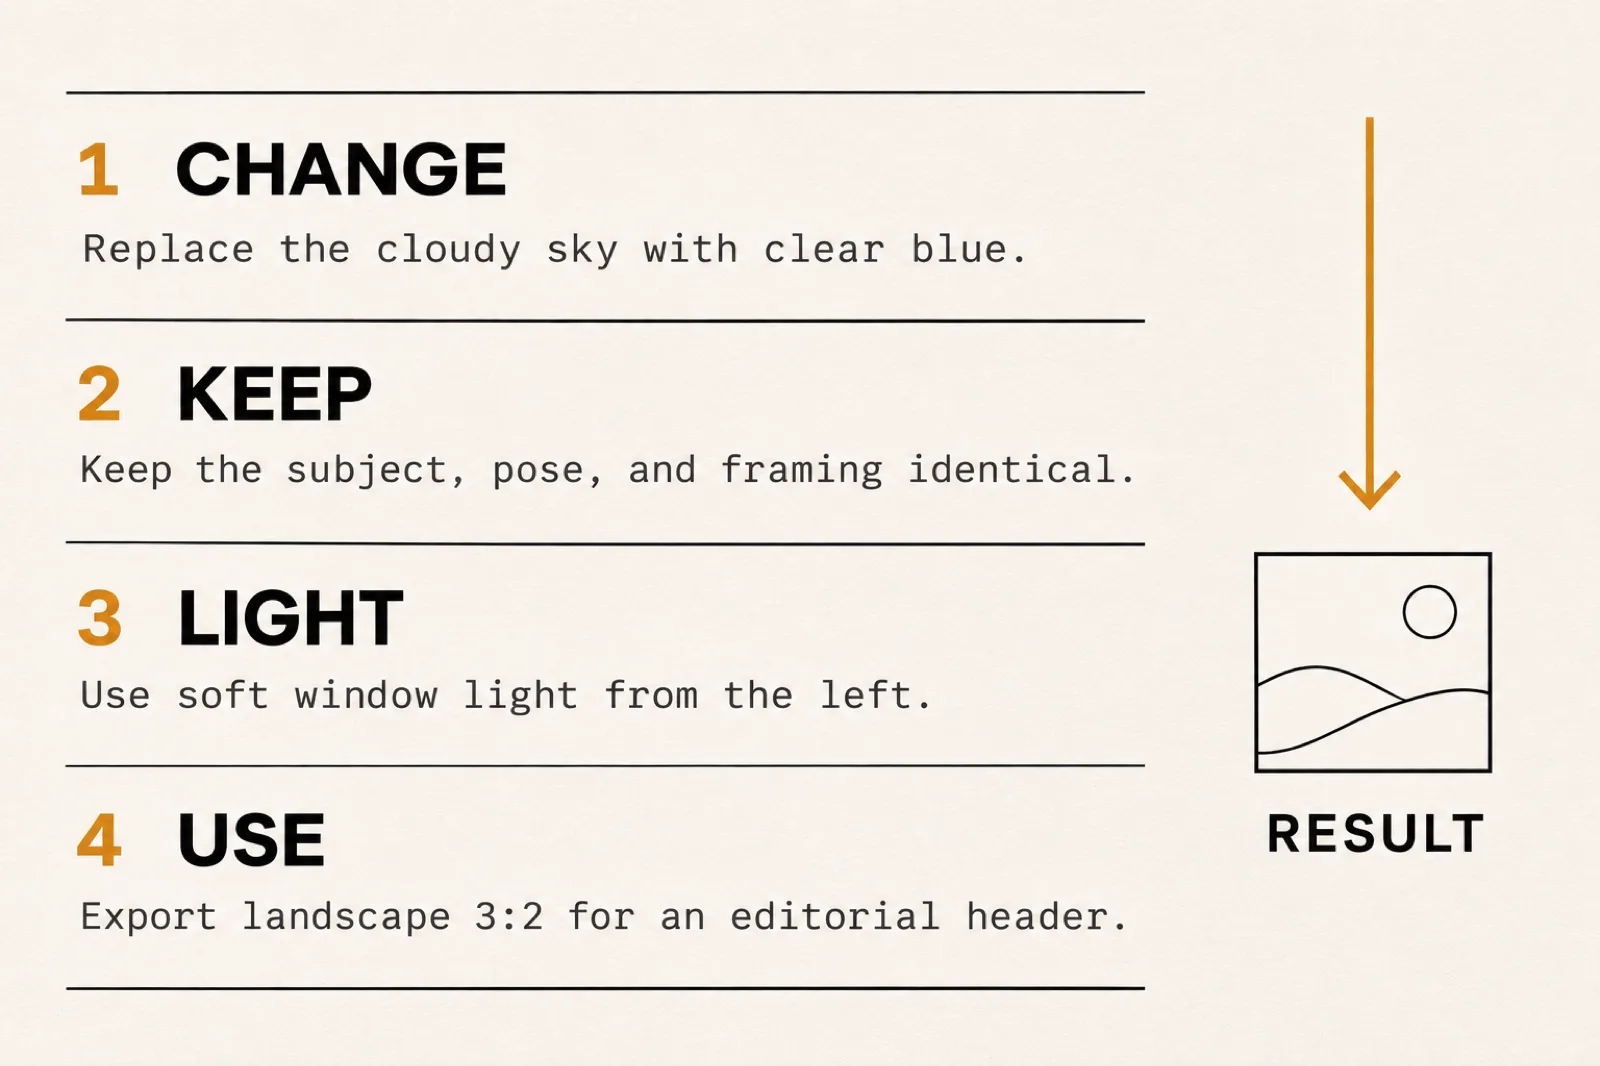
The four-line structure this guide uses throughout. Line two does more work than most people expect; models redraw far more of the frame than you asked for unless you name what to protect.
What MeiGen AI Is, in Plain Terms
MeiGen AI is a browser-based studio built around a single prompt bar. Attach nothing and it is a text-to-image generator. Attach one photo and it becomes an image-to-image editor. Attach several and it blends references with roles you assign in the prompt.
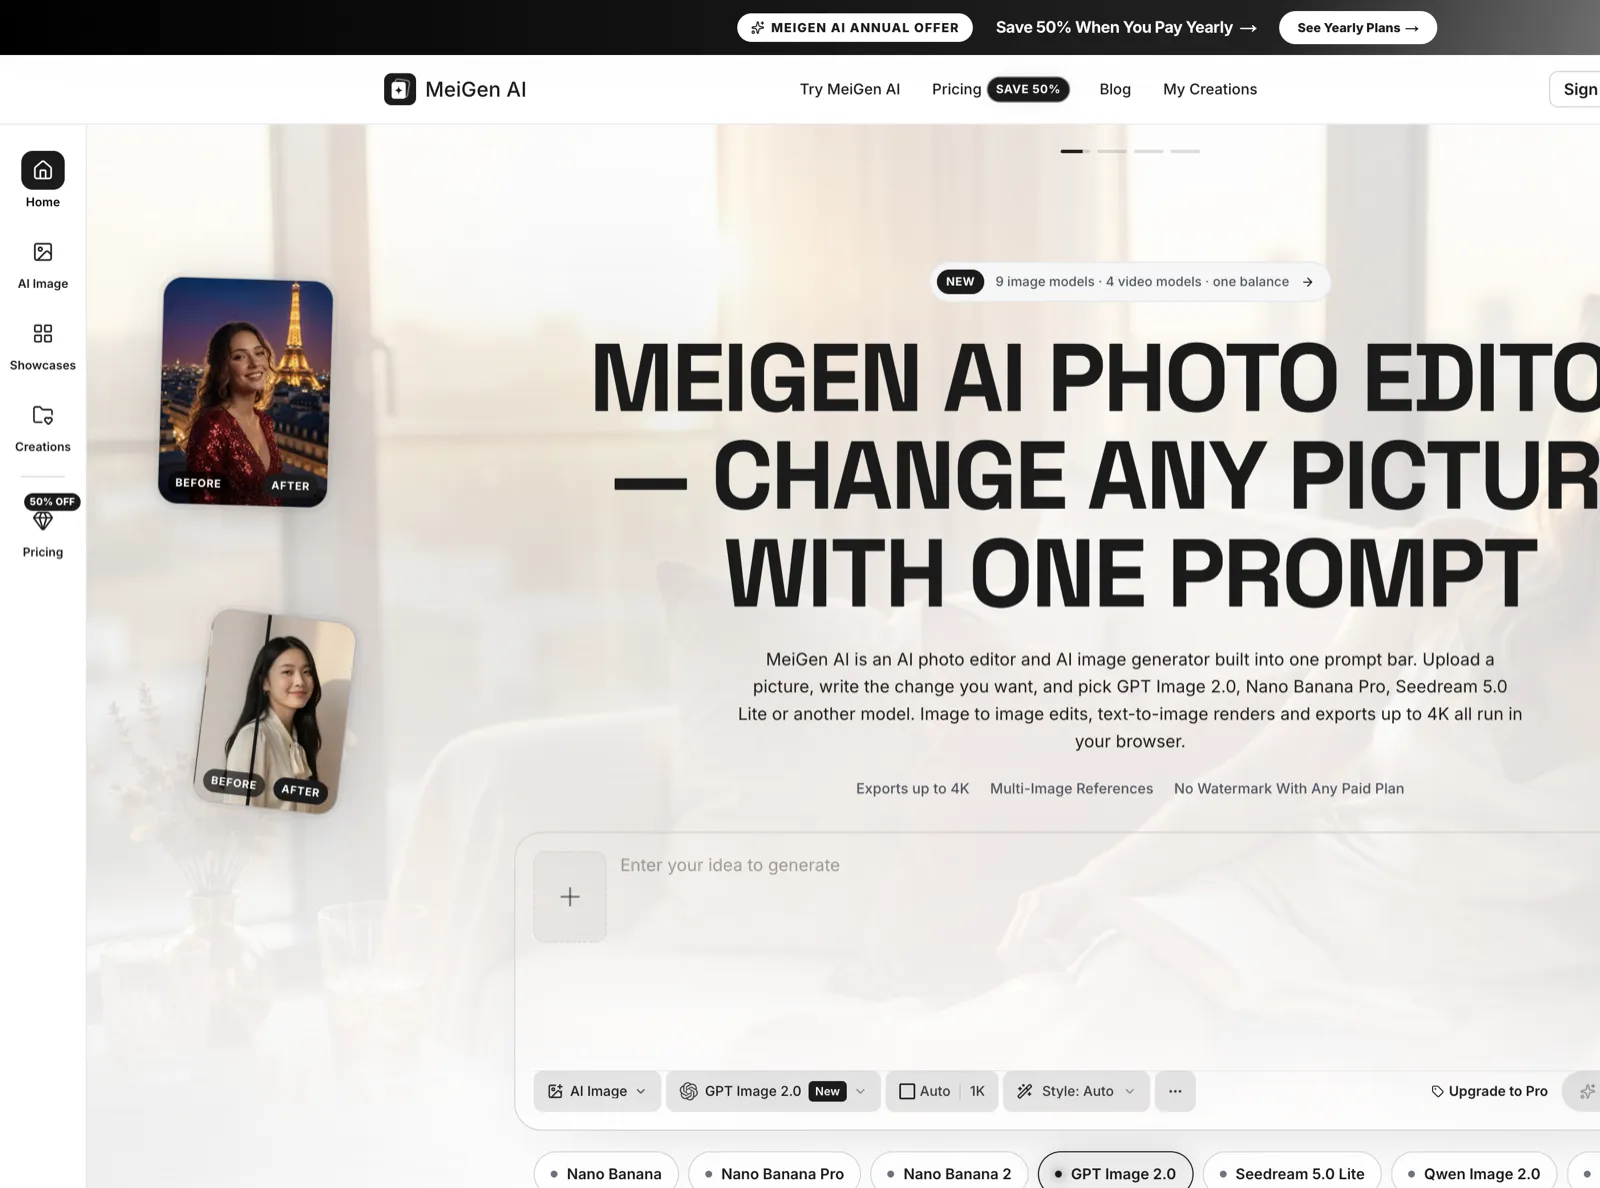
The meigenai.co homepage, captured November 4, 2026. Prompt box, model selector, resolution and style controls sit above the fold, and the before/after cards double as worked examples you can reopen in the editor.
Three design decisions matter more than the feature list:
One balance across every model. There are no per-model subscriptions and no API keys to wire up. The model is chosen per request, which makes A/B testing genuinely practical: same prompt, two models, compare at full size. That is a workflow most single-model tools cannot offer.
Results keep their prompt. Every generation is stored in My Creations with the prompt and settings that produced it. For repeatable client work this is the difference between "I got lucky once" and "I have a recipe."
It is explicitly an aggregator. The About page states that MeiGen AI is an independent service that connects to models built and owned by their respective developers, and that it is not partnered with or endorsed by them. That candor is worth noting, because it means the model names in the menu tell you something real about the engine underneath each render.
The Model Menu, and Why It Is the Most Important Choice
The homepage names GPT Image 2.0, Nano Banana Pro, Seedream 5.0 Lite and Qwen Image 2 in its copy, and the interface lists nine image models plus four video models. The documentation's comparison table is longer and more specific, and it is the better source for planning. Here is the lineup as documented, with what each one is actually good for:
| Model | Credits per image | Reference images | Best for |
|---|---|---|---|
| Agnes Image 2.5 Flash | 1 | 1 | High-volume drafts, covered by daily free credits |
| Flux 3 Image Klein | 2 | None | Cheap base renders, general text-to-image |
| GPT Image 2.0 | 2 / 5 / 10 at 1K / 2K / 4K Std | Up to 16 | Instruction following, readable in-image text |
| GPT Image 2.5 | 4–88 by resolution × quality | Up to 16 | Precise edits, five quality tiers, two variants |
| Nano Banana 2 | 5 | Up to 14 | Fast general use, very wide aspect ratios |
| Nano Banana 2.1 | 5 at 2K, 8 at 4K | Up to 14 | Sharper text rendering than 2.x at 4K |
| Nano Banana Pro | 10 | Up to 14 | Complex scenes, fine detail, premium quality |
| Seedream 4.5 | 5 | Up to 10 | Product photography, marketing visuals |
| Seedream 5.0 Pro | 10 at 1K, 20 at 2K | Up to 10 | Multi-subject composition, character consistency |
| Grok Imagine 2.0 | 10–18 by resolution/quality | Up to 3 | Precise edits, infographics, UI mockups |
| Midjourney V8.2 | 10 at 1K, 18 at 2K | 1 | Photorealistic aesthetics, four candidates per job |
Two practical notes from the docs that are easy to miss. First, GPT Image 2.0's price scales with resolution and quality independently — 2 credits at 1K Standard versus 80 credits at 4K High. That is a 40× spread on the same model, so "how much does an image cost" has no single answer. Second, Midjourney returns four candidates and charges once, which changes its effective price per option.
If you are unsure where to start, this is the decision tree we actually use:
- Poster, packaging, signage, any legible text → GPT Image 2.0 or 2.5. Text rendering is the deciding factor, not aesthetics.
- Fast exploration, ten bad ideas to find one good one → Agnes Flash or Nano Banana 2 at 1–5 credits. Never burn 40 credits on a guess.
- Final hero image at 4K → Nano Banana Pro or GPT Image 2.5 at 4K, once you know the direction.
- One character across many frames → Seedream 5.0 Pro or Nano Banana 2, because both accept ten or more references.
- Photoreal texture and grain → Midjourney V8.2, accepting that you get four candidates and one reference image.
How to Make the Edit: A Seven-Step Workflow
Step 1: Choose the source photo you can actually defend
Every prompt-based edit inherits the flaws of its input. A soft, underexposed, heavily compressed JPEG does not become a sharp hero image; it becomes a soft hero image with invented detail where the model guessed.
What to use: the sharpest, best-lit, highest-resolution version you have. Subject in focus, unobstructed, with the edges of the subject clearly separated from the background. For products, a clean packshot beats a lifestyle shot every time, because the model has less ambiguity to resolve.
What to avoid: screenshots of screenshots, images already processed through three social apps, and anything where the subject is cropped at the edge of the frame. A subject that runs off the canvas gives the model no information about what should be there.
Uploads are accepted as PNG, JPG or WebP, with the size ceiling shown next to the uploader.
Step 2: Write four lines, not one
This is the core technique and it is not complicated. Most disappointing AI edits come from prompts that only contain the first line.
Line 1 — the change. One concrete modification, naming the target and its location. "Replace the background behind the bottle with a warm travertine wall." Not "make it more premium."
Line 2 — the keep. Everything that must survive, named explicitly. "Keep the bottle shape, the amber glass color, the black dropper cap, the label text and the product's position in frame." This line is the single biggest quality lever you have, because image models regenerate the entire frame; whatever you do not name is available for reinterpretation.
Line 3 — the light. Direction, quality and color temperature. "Soft directional light from the upper left, warm 3200K, long soft shadow falling to the right." Light is the most common reason an edit looks pasted-in: the subject is lit for the original scene and the new background is not.
Line 4 — the use. The output format and where the image goes. "Vertical 4:5, empty space at the top for a headline, for a paid social ad." This line quietly controls framing, negative space and crop.
You can see the whole structure in one prompt:
Replace the background with a pale limestone studio wall and a stone counter. Keep the bottle shape, glass color, dropper cap, label text and exact position unchanged. Soft directional window light from the left, warm tone, realistic contact shadow under the base. Render at 3:2, 2K, with breathing room on the right for text.
Compare that to "make this look like a professional product photo" and the reason one works becomes obvious.
Step 3: Pick the model before you pick the resolution
Model first, resolution second. A 4K render from the wrong model is an expensive wrong answer. Test the direction at 1K on a cheap model, confirm the composition and the lighting logic, then re-run the winning prompt on the premium model at 2K or 4K.
MeiGen AI shows the credit total on the Generate button before you submit, next to your remaining balance. That single UI decision removes most of the anxiety around model choice: you can price a decision before making it.
Step 4: Set the frame for the channel, not the canvas
Aspect ratio is a marketing decision disguised as a technical setting. Square for feed posts, 4:5 for portrait feed and product pages, 9:16 for stories and short-form video, 16:9 and 21:9 for banners and site headers.
The available ratios vary by model. GPT Image 2.0 and 2.5 support the widest range, including unusual extremes such as 3:1 and 1:3, while Nano Banana 2 goes further with 4:1 and 8:1 ultra-wide frames. If your layout needs something exotic, check the ratio list before you fall in love with a model.
Step 5: Compare against the original at 100 percent
Zoom in. This is the step almost everyone skips, and it is where AI edits are caught.
Check in this order: faces and hands, text and labels, logos, edges around hair and glass, shadow direction, and perspective. Then check whether the edit you asked for actually happened. A result can look convincing at thumbnail size and fall apart the moment a client opens it full screen.
Step 6: Change one thing per follow-up
If the result is 80 percent right, do not rewrite the whole prompt. Change one variable: warmer light, a different surface, a tighter crop. Each follow-up is a new generation that redraws everything, so stacking five changes at once means five chances for something you liked to drift.
One nuance worth knowing: every follow-up that starts from an already-edited image compounds drift. Faces, small text and fine texture shift a little in each pass. When an edit has gone sideways, go back to the original photo and fold the successful instructions into a single prompt rather than iterating on a copy of a copy.
Step 7: Export at the size you will actually use
Download as PNG or WebP. Paid plans remove the watermark and include commercial use of your outputs; free credits are for testing. Render the final at the resolution the destination needs — 4K for print or large displays, 2K for most web and social, 1K for internal review — so you are not upscaling a draft later.
Workflow A: One Phone Photo Into an Ad-Ready Product Set
Product photography is the highest-value use case and the one with the clearest failure mode. A studio shoot takes days and a budget; an AI scene takes minutes. But a product image that misrepresents the product generates returns, complaints and, on some marketplaces, listing problems.
The workflow that works:
- Start from a real packshot — sharp, evenly lit, label legible, product filling most of the frame.
- Describe the scene, not the product. The product is already in the image; your words should be spent on surface, wall, light and mood.
- Protect the label explicitly. Name it: "keep the label text exactly as written, including the ingredient line."
- Generate three directions, not thirty. White studio, warm stone, botanical daylight. Compare at full size, then pick.
- Verify against the physical item. Hold the real product next to the render. Check label spelling, cap shape, glass tint, fill level.
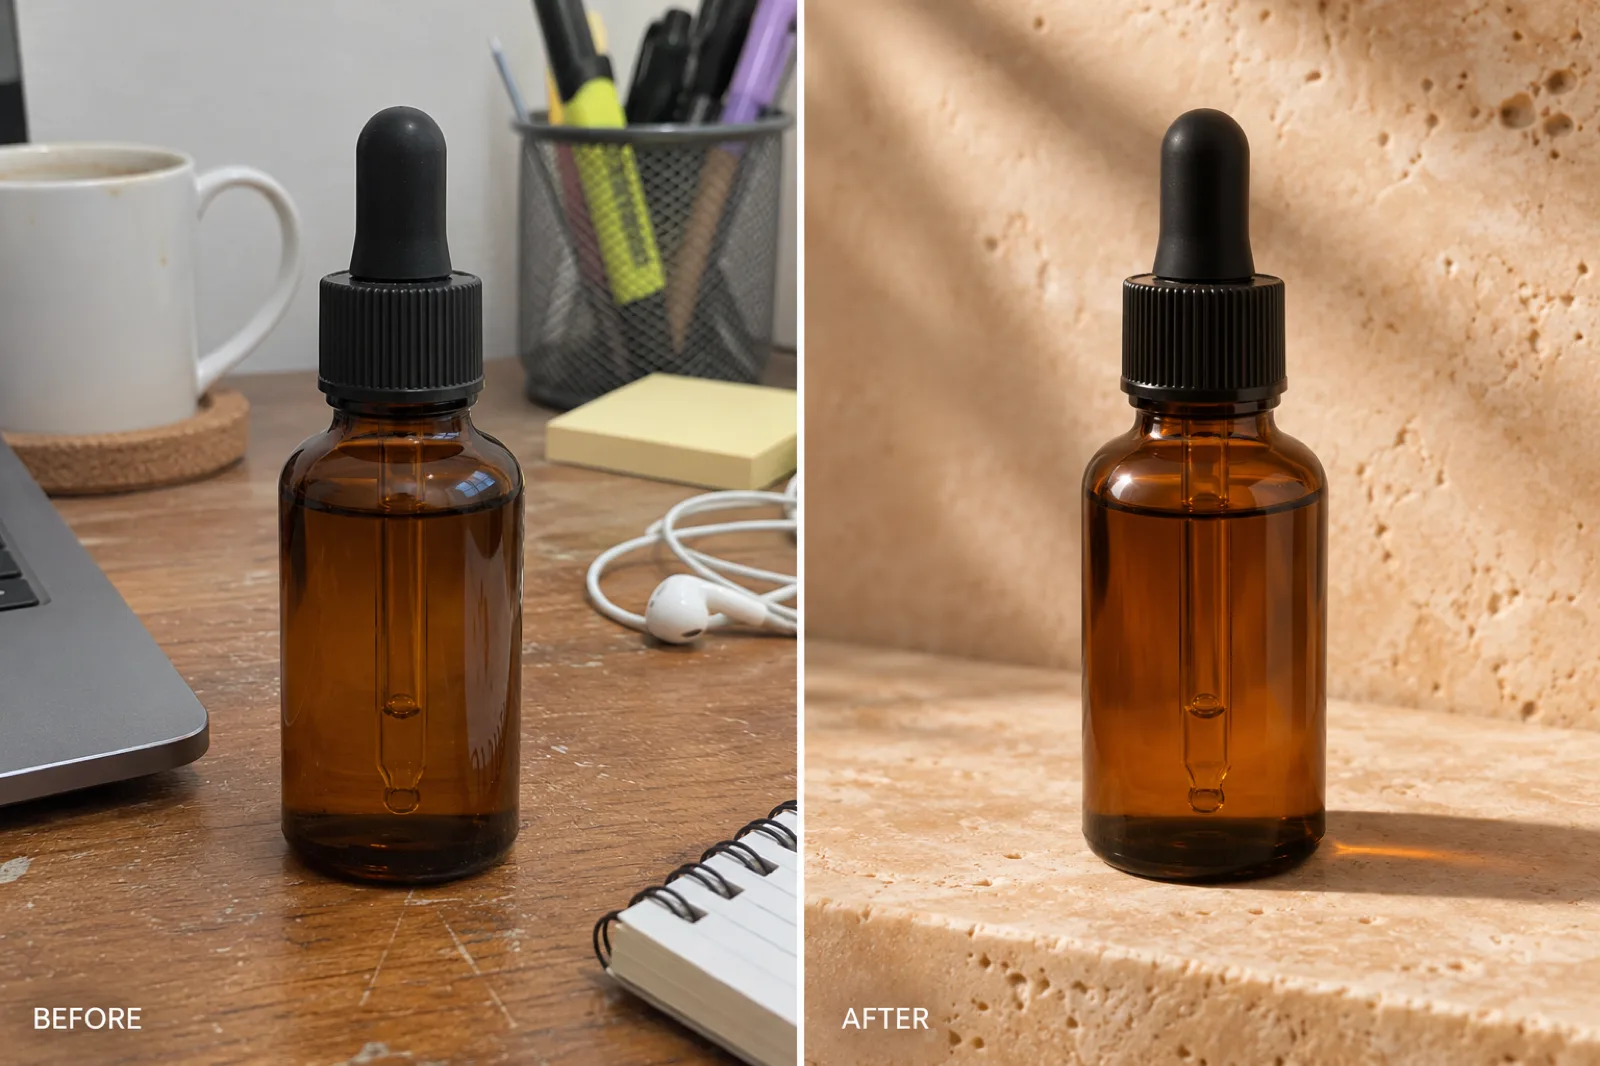
Illustration created for this article with an AI image model: one ordinary desk snapshot of a fictional serum bottle, and the same bottle restaged on travertine. The bottle geometry and label area carry over; surface, light and mood are new. This is the shape of the edit — not a screenshot from the product.
What holds up: lifestyle scenes, seasonal variants, campaign imagery, secondary listing images, and social crops. What does not: the main marketplace image, which generally requires the actual product on a pure white background and no creative interpretation. Use the White studio direction and verify every detail, or keep a real photograph.
Workflow B: Keeping the Same Face Across Ten Images
Character consistency is the hardest problem on this list, and the one where marketing claims deserve the most skepticism. Image models do not remember previous outputs. Every generation starts fresh, so the same written description produces a slightly different face each time.
Reference conditioning is the workaround: you supply one or more images of the character and the model uses them as a visual anchor. MeiGen AI supports this at scale — Nano Banana 2, Nano Banana 2.1 and Nano Banana Pro accept up to 14 references, the Seedream models up to 10, and the GPT Image models up to 16.
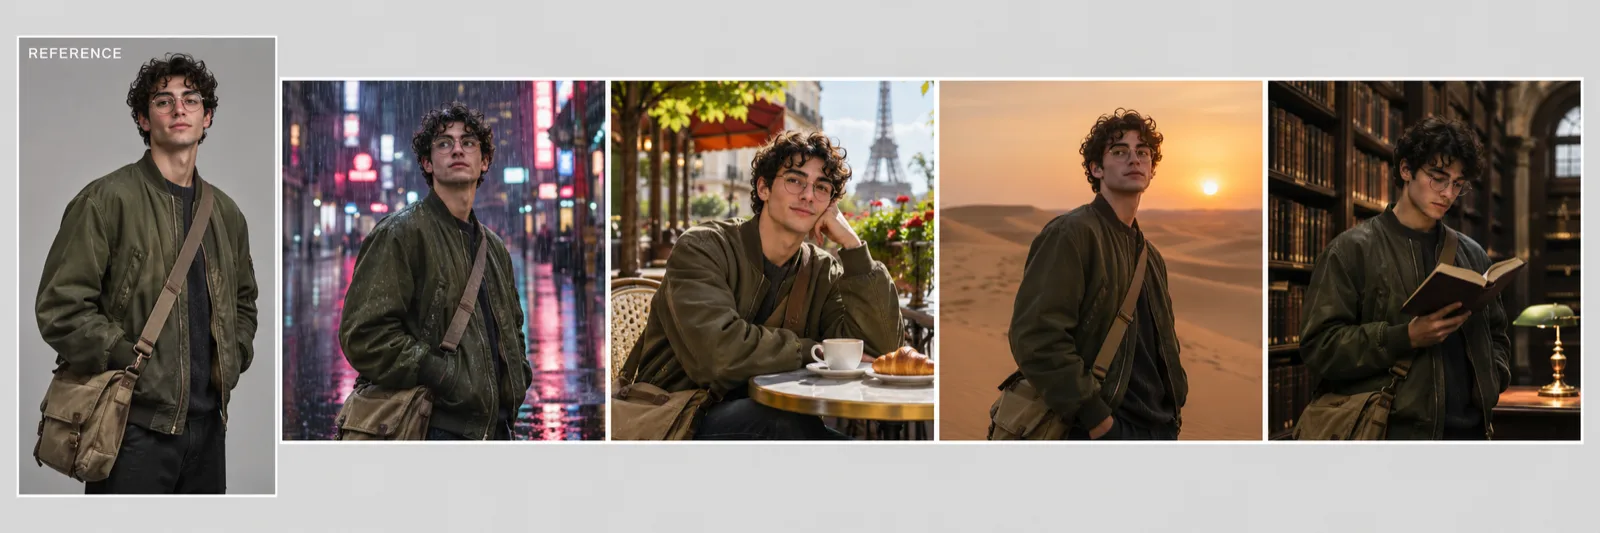
Illustration created for this article with an AI image model: one studio reference of a fictional character, then four scenes that reuse it. Hair, glasses, jacket and bag stay fixed while location, time of day and light change. The character is fictional; no real person's likeness is used.
A workflow that actually holds:
- Write an identity block once and never edit it. Age range, face shape, hair, eyewear, wardrobe, palette, one or two signature props. Paste it verbatim into every prompt.
- Build a clean reference first. Front view and three-quarter view, plain background, even light, face fully visible. Busy group photos make weak anchors.
- Assign roles when you blend. With multiple inputs, say what each image is for: "Image 1 is the face reference, Image 2 is the wardrobe, Image 3 is the location." Leaving references unlabelled is the most common cause of a blended, wrong-looking result.
- Change one variable per frame. Action, camera angle, setting or mood — pick one.
- Promote the best output into the reference set. Your anchor gets stronger as the project proceeds.
Even done well, this is reference-guided, not identity-locked. Expect small drift. For a comic, a children's book or a brand mascot, a distinctive hair color or a signature accessory does more for recognizability than any prompt phrasing: it gives the model something easy to hold and the viewer something to remember.
Workflow C: Generating From Text With No Input Image
Leave the upload tray empty and the same bar renders a scene from words alone. This is the AI image generator half of the product, and the prompt discipline is different: with no source image, you have to specify everything the photo would have shown.
A prompt that travels well across models has five parts:
- Subject — who or what, with concrete material detail: "a ceramic pour-over dripper, matte sage green."
- Setting — where it sits: "on a pale oak counter beside a window."
- Light — direction and quality: "low morning sun from the right, long soft shadows."
- Camera — framing and lens feel: "three-quarter view, 50mm, shallow depth of field."
- Use — output shape: "vertical 4:5, empty space at the top for a headline."
Change one element between attempts and you learn what each word does. Rewrite the whole prompt and you are rolling dice — expensive dice, once you move up to 2K.
For text inside images, quote the exact words you need in quotation marks and give any brand colors as HEX codes. Both are supported conventions in this class of model and both reduce retries. Then check every letter yourself; no current model is trustworthy on long strings.
AI Image Editor Online: Where It Beats a Desktop Editor, and Where It Loses
The honest comparison, since "AI image editor online" is a search people run when they are deciding whether to cancel something.
Prompt-based editing wins when: you need many variants of one approved visual for different channels; the change is environmental (background, season, light, location); you are exploring art direction and want twenty directions before lunch; you are a solo operator without retouching skills; you need a result on a phone or a borrowed laptop.
A desktop editor wins when: typography must be exact; brand colors must match a specification; a mask must be pixel-accurate; you are compositing real photographs at high resolution; you need non-destructive history; a client will inspect at 400 percent; or the deliverable must be reproducible from a project file months later.
In practice most professionals use both, and the split is by stage. AI for divergence — many rough directions fast. Manual editing for convergence — the last five percent that makes it publishable.
Where Prompt-Based Editing Still Breaks
Knowing the failure modes saves more credits than any prompt trick.
Text and labels. Long strings, small type and unusual fonts get redrawn. Short quoted headlines usually survive; an ingredient list usually does not. Plan to composite real typography for anything a regulator or a lawyer might read.
Logos and packaging geometry. A logo may be simplified, mirrored or slightly restyled. Cap threads, bottle shoulders and shoe stitching drift. If the shape is a brand asset, verify it.
Hands and small repeated detail. Fingers, teeth, earrings, zippers, chain links. Compare crops at 100 percent.
Exact color. "Warm" and "cool" are reliable; "Pantone 7548 C" is not. Sample the output in a color picker if the brand palette matters.
Transparency. MeiGen AI's documentation is explicit that a transparent background can be requested in the prompt but is not guaranteed. For a real cutout, remove the background from an existing image rather than generating one with alpha.
Consent and rights. Only upload faces, products and logos you have the right to use. The models have content moderation, and it is stricter for real people, celebrities and brand marks — prompts naming them are more likely to be rejected. That restriction is a feature.
What the Credits Actually Buy
MeiGen AI sells monthly and yearly plans plus one-time packs. The listed yearly prices on November 4, 2026:
| Plan | Price (yearly, per month) | Credits per month | Credits per year | Images per month (as listed) |
|---|---|---|---|---|
| Starter | $9.90 | 800 | 9,600 | ~80 |
| Pro | $19.90 | 2,000 | 24,000 | ~200 |
| Studio | $44.90 | 6,000 | 72,000 | ~600 |
The "images per month" figures assume 10 credits per image, which lines up with Nano Banana Pro. If you work on GPT Image 2.5 at 4K Max, 88 credits changes the arithmetic dramatically: the Starter plan buys nine images, not eighty. That is not a trick, it is just how per-model pricing works — but it is the number people forget when they compare plans.
Three credit mechanics worth knowing:
- Credits are charged per generation, not per month of access. Cost depends on model, resolution and number of outputs, and is shown before submission.
- Failed jobs refund. If a generation fails on the provider side, the reserved credits return to your balance automatically.
- Expiry differs by purchase type. Monthly credits last 30 days, yearly credits 365 days, one-time packs up to ten years. If you work in bursts, one-time packs are the more efficient shape.
- Daily free credits cover basic models only. They reset at 00:00 UTC and do not apply to premium models such as GPT Image 2.5, Nano Banana Pro or the Seedream tiers. Useful for testing the interface; not a production budget.
All paid plans list commercial use and no watermark on downloads. Compare current terms on the MeiGen AI pricing page before subscribing, since discount banners and plan contents move.
Six Mistakes That Waste Credits
- Prompting only the change. Without a keep-line, the model improves things you were happy with.
- Rendering finals first. Explore at 1K on a 1–5 credit model; spend 2K and 4K on the direction that already works.
- Changing five variables at once. You lose the ability to learn which instruction fixed the problem.
- Trusting AI text. Check every letter. Fix real typography in an editor.
- Iterating on an edited copy. Drift compounds. Return to the original and fold working instructions into one prompt.
- Describing the product instead of the scene. The product is already in the photo. Your words belong to the surface and the light.
Frequently Asked Questions
Is MeiGen AI free?
You can browse, and daily free credits cover the models marked basic. Premium models — GPT Image 2.5, Nano Banana Pro, Seedream, Midjourney and the video models — need welcome or purchased credits. Paid plans start at $9.90 per month on yearly billing, and one-time packs are available for occasional use.
Can I edit a photo without writing a prompt?
Not meaningfully. Every operation on MeiGen AI is prompt-driven; there is no brush or mask tool in the main editor. The interface offers task shortcuts that pre-fill the prompt bar, which is the closest thing to a preset.
How many reference images can I attach?
It depends on the model. GPT Image 2.0 and 2.5 accept up to 16, Nano Banana 2, 2.1 and Pro up to 14, Seedream up to 10, Grok Imagine up to 3, and Midjourney takes one content or style reference. Fewer clean references usually beat many mixed ones.
Can I use the images commercially?
Paid plans list commercial use and watermark-free downloads. You remain responsible for the rights to anything you upload — photos of people, products, logos — and for whether an AI-generated image accurately represents a real product you sell.
Does it do video too?
Yes. The same prompt bar lists video models including Veo 3.1 Fast and Quality, Sora 2 and Seedance 1.5 Pro, paid from the same credit balance. Video pricing is per second or per generation and is substantially higher than image pricing.
Is it a replacement for Photoshop?
No. It replaces the exploratory and environmental parts of the workflow — variants, backgrounds, lighting, concept directions. It does not replace masks, layers, exact typography, color management or a repeatable project file. Most professional users run both.
What resolutions are available?
1K, 2K and 4K on the models that support it: GPT Image 2.0 and 2.5, Nano Banana 2.1 and Pro, and Wan 2.7 Image. Other models return their own fixed output size, shown in the settings. 4K is paid-only across the lineup.
The Bottom Line
Prompt-based photo editing is not a smaller version of Photoshop. It is a different instrument with a different failure mode. The skill being tested is not brush control or masking; it is the ability to describe a photograph precisely enough that a model can rebuild it without losing the parts you never mentioned.
That is why the four-line prompt — change, keep, light, use — does most of the work, and why model selection matters more than prompt length. On MeiGen AI the practical loop is: draft cheap, judge at 100 percent, protect the label, then render the keeper at full resolution on the model that suits the job. The showcases page is a reasonable place to start, because every card is a working prompt you can inspect and adapt rather than a marketing image you have to reverse-engineer.
If your project is video rather than stills, the same discipline applies one layer up: the tools that win are the ones that turn a model into a repeatable workflow, not the ones with the longest feature list. Start at 1K, keep the prompts that work, and only pay for resolution once the direction is settled.
Before you publish anything, do the boring check: zoom in, read the label, count the fingers, compare the color. The prompt got you ninety-five percent of the way. The last five percent is still your job.