Five phrases bring people to the same page: Nano Banana AI, Nano Banana Pro, Nano Banana 2, Nano Banana AI Image Generator and Nano Banana AI Photo Editor. They sound like four products and a category. They are actually one model family with a nickname problem, wrapped in a workflow problem. The nickname came from a demo arena. The workflow is what decides whether you get a usable image or a beautiful near-miss.
This guide is the how-to for the workflow, written against Nano Pro, a browser workspace that puts the base, Pro and 2 variants of the model side by side in one credit balance. We will make three concrete things — a product shot from a phone photo, a poster with type you can actually read, and a character sheet that survives ten scenes — plus the fourth job almost nobody plans for: merging several references into one coherent frame.
Quick answer: Nano Banana is the public nickname for Google's Gemini image models. Nano Pro hosts three of them behind one prompt box: the fast base model at 15 credits, Nano Banana Pro at 60 to 80 credits for the cleanest lettering and 4K detail, and Nano Banana 2 at 30 to 60 credits with up to 14 reference images and extreme shapes like 8:1. New accounts get 15 welcome credits, which is exactly one render on the fast model. Plan your first three moves before you sign up, because the free balance does not cover a rehearsal.
A note on sources: the model names, credit prices, reference limits and plan totals below were read from nanopro.app and its pricing page, and from Google's own Gemini API documentation, on November 4, 2026. Google ships image models on a schedule measured in weeks, so treat every number here as a snapshot. The Generate button always shows the live cost for your settings. We are a video team, we do not sell this tool, and our editorial policy explains how we treat vendor claims we have not reproduced ourselves.
First, Untangle the Five Keywords
The naming is genuinely confusing, and getting it straight saves you money. Here is the family tree, from Google's announcements rather than from marketing pages:
| Name people search | What it actually is | First shipped |
|---|---|---|
| Nano Banana AI | Gemini 2.5 Flash Image, gemini-2.5-flash-image. The original, nicknamed in a model arena before Google adopted the name. | August 2025 |
| Nano Banana Pro | Gemini 3 Pro Image, gemini-3-pro-image. Reasoning-driven, multilingual text, up to 4K, SynthID + C2PA credentials. | November 20, 2025 |
| Nano Banana 2 | Gemini 3.1 Flash Image, gemini-3.1-flash-image. Pro-level ability at Flash speed and price. | February 26, 2026 |
| Nano Banana 2.1 | gemini-nano-banana-2.1, generally available October 6, 2026. Better adherence, better text, extreme ratios like 8:1. | October 6, 2026 |
| Nano Banana AI Image Generator | Not a model. A text-to-image mode on top of those models. | — |
| Nano Banana AI Photo Editor | Not a model either. The image-to-image mode: upload a photo, describe the change. | — |
Two consequences fall out of that table.
The first is that "Nano Banana AI Image Generator" and "Nano Banana AI Photo Editor" are not rivals. They are two doors into the same room. Nano Banana was notable precisely because it edits an existing photo by instruction while keeping the subject recognisable, which is a different engineering problem from growing a picture out of noise. Google's own prompting guidance says as much: describe the scene when you generate, and describe the change plus everything that must stay when you edit.
The second is that a reseller's model label is a promise, not a version pin. If a workspace says "Nano Banana 2", the underlying API revision behind that label could be 3.1 Flash Image or its 2.1 successor, depending on when the operator migrated — and Google deprecated gemini-3.1-flash-image in favour of gemini-nano-banana-2.1. That is not a scandal, since 2.1 is an improvement, but it explains why two sites labelled "Nano Banana 2" can return slightly different lettering quality on the same prompt. Judge the output, not the dropdown.
Why the Workspace Matters More Than the Model
A single model in a chat box is a toy. A workspace adds the four things that actually gate quality: model choice on the same prompt, a fixed reference tray, a resolution ladder you can afford, and a history you can return to.
Nano Pro's editor is built around exactly those four. You get one prompt box that handles text-to-image and photo edits without switching pages, a model picker that lists Nano Banana, Nano Banana Pro, Nano Banana 2, GPT Image 2.0, Seedream 5.0 Lite and Qwen Image 2.0 for stills plus Veo 3.1 and Seedance 1.5 Pro for video, an aspect dropdown that reaches 21:9 and even 8:1 strips, and a My Creations library that saves the prompt with every render so a result from three weeks ago is still editable.
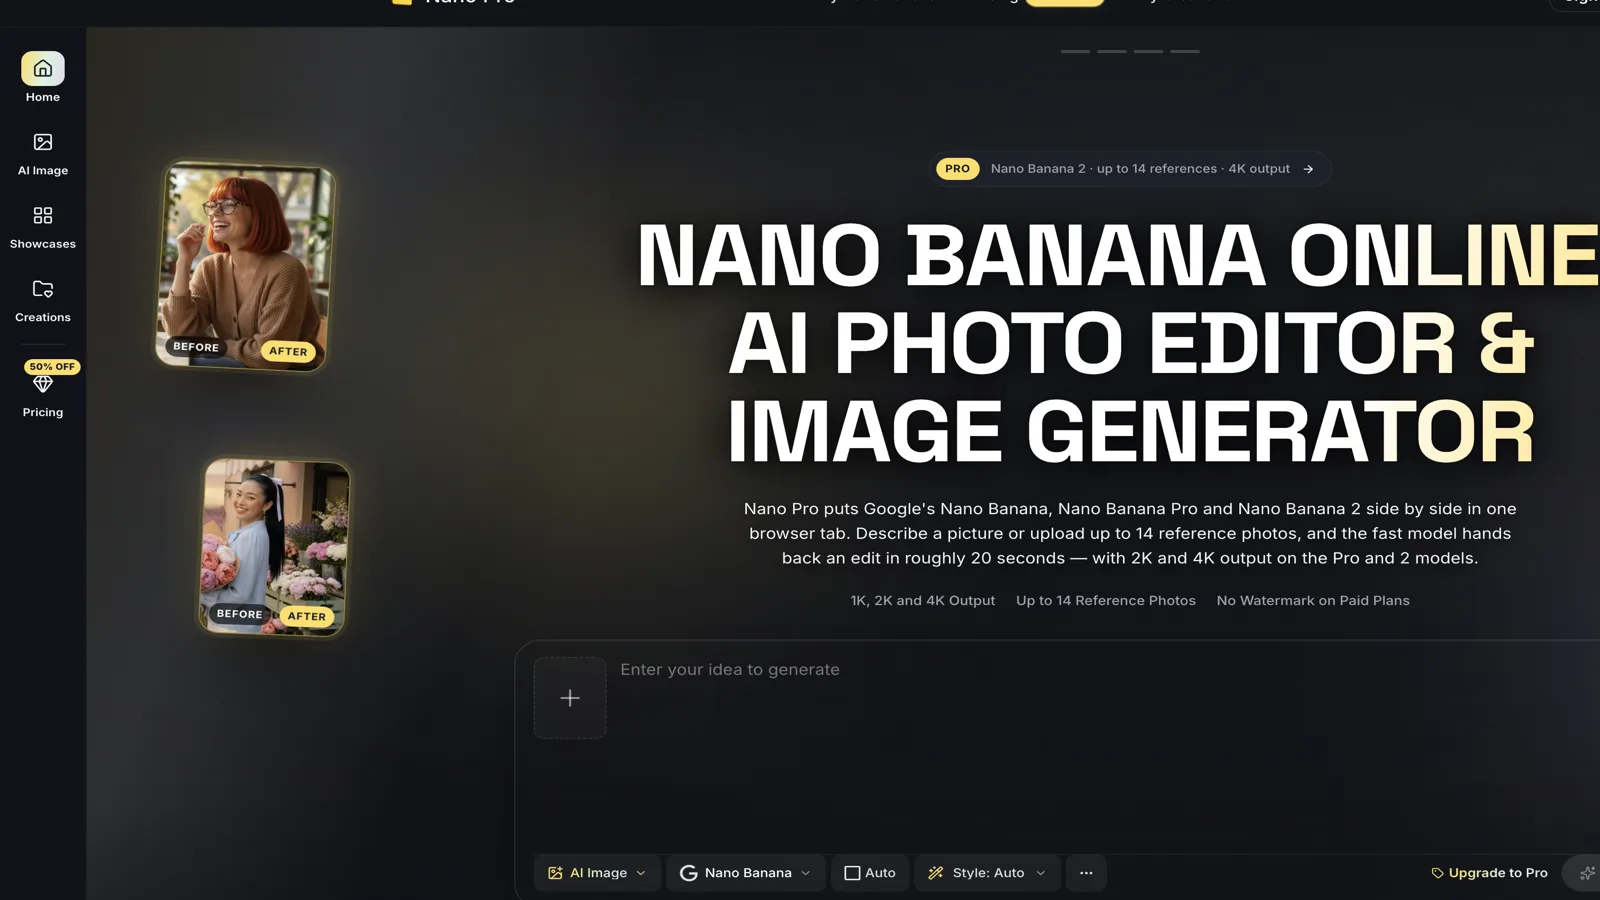
Screenshot of the editor at nanopro.app, taken November 4, 2026. The model pills sit directly under the prompt box, which is the single most useful layout decision on the page: switching engines on an identical prompt is one click, not one re-brief.
The honest caveat is in the footer, and it is worth quoting because most competitors bury it: "nanopro.app is an independent service and is not affiliated with, endorsed by or sponsored by Google." You are paying a credit reseller for convenience — no API key, no billing project, no rate-limit dashboard — and the trade is that model availability moves when the upstream provider moves. That is a reasonable trade for a designer or a small seller. It is a bad trade if your production pipeline needs a pinned model version with a contract behind it.
How to Make a Product Shot From One Phone Photo
This is the highest-value job on the list, because a real studio shoot costs a day and this costs 15 credits. It is also the job where AI most often quietly lies about your product, so the workflow has to include a check.
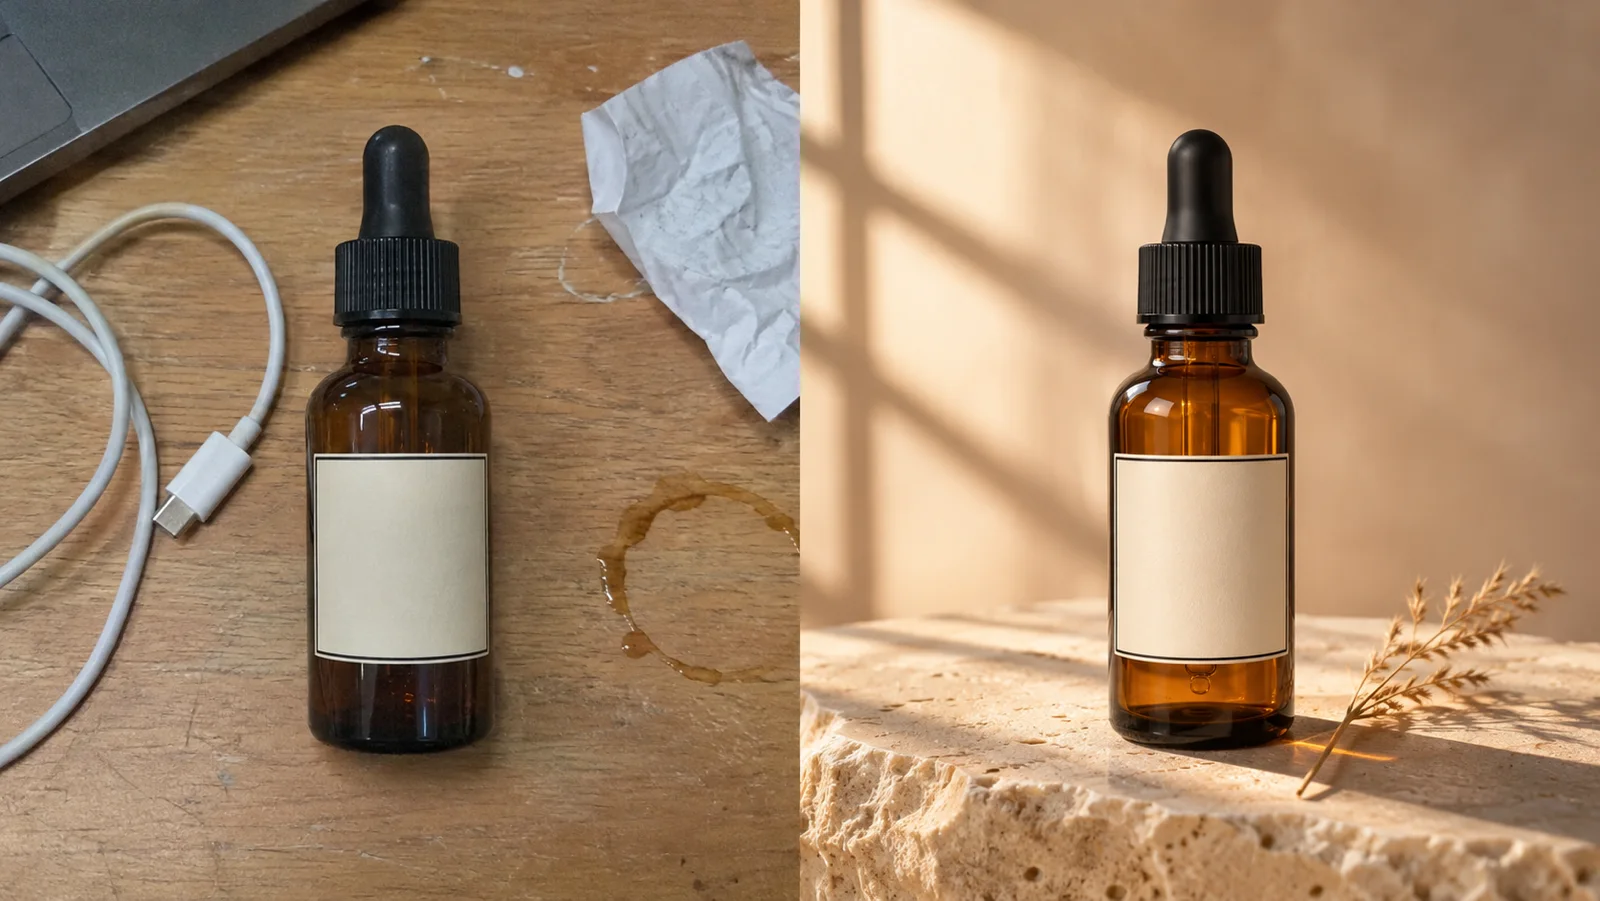
Illustration made for this article with an AI image model: the left frame is the kind of messy desk snapshot the workflow starts from, the right frame is the kind of studio scene it targets. The bottle silhouette, cap and label rectangle are meant to stay put while only surface, light and setting change. It is not a render we bought from nanopro.app.
Step 1: Take the boring photo. Sharp focus, even light, product filling about 70 percent of the frame, no hand in shot, label facing the camera. The model can invent a limestone plinth. It cannot recover detail you never captured. Shoot at the highest resolution your phone offers, in JPG, PNG or WebP.
Step 2: Write the brief as a change, not a wish. The prompt that fails sounds like "make it look professional". The prompt that works names five things: the new surface, the new light, the new mood, the framing, and the list of what must not move. Something like this:
Keep the bottle exactly as it is — same amber glass, same black dropper cap, same label rectangle in the same position. Replace the background with a warm limestone block and a pale plaster wall. Light it with low afternoon sun from the left, long soft shadows, faint window-frame pattern on the wall. One dried grass stem lying beside the base. Shallow depth of field, 85mm feel, editorial skincare campaign.
Step 3: Draft cheap, finish expensive. Run the prompt at 1K on the fast model for 15 credits. Change one variable per round — surface first, then light — and stop when the composition is right. Only then re-run the keeper at 2K or 4K on Nano Banana Pro, at 60 or 80 credits. Rendering 4K first is the single most common way to waste a plan: eighty credits buys one guess at 4K or five attempts at 1K.
Step 4: Compare before you download. Put the result next to the original at full size and check four things in this order: label text, cap threads, silhouette, and reflections on the glass. Label text is where these models still slip. Nano Pro's own copy says the Pro and 2 models "letter noticeably better than the base model, but proofread every word before it goes to print" — that is the right level of confidence to hold.
Step 5: Know where it cannot go. A generated image is fine for a campaign hero, a secondary listing photo, or a seasonal variant. It is the wrong tool for a marketplace main image that legally must show the actual product, and it is the wrong tool for anything where the label carries a regulated claim. If the AI moved a millimetre of type on an ingredients panel, you have created a compliance problem, not a marketing asset.
The AI image generator has a short pre-flight panel that is worth reading once: it reminds you that the active model and its credit cost are visible before you press Generate, and that you should only upload images you have the right to edit. That second point matters more than it looks, because reference-conditioned models are very good at reproducing a face you fed them.
How to Make a Poster With Type You Can Read
Text rendering is the clearest difference between the three models, and the reason the Pro tier costs four to five times the base rate. If your image needs a headline inside the pixels, this is the job where paying for Pro is not vanity.
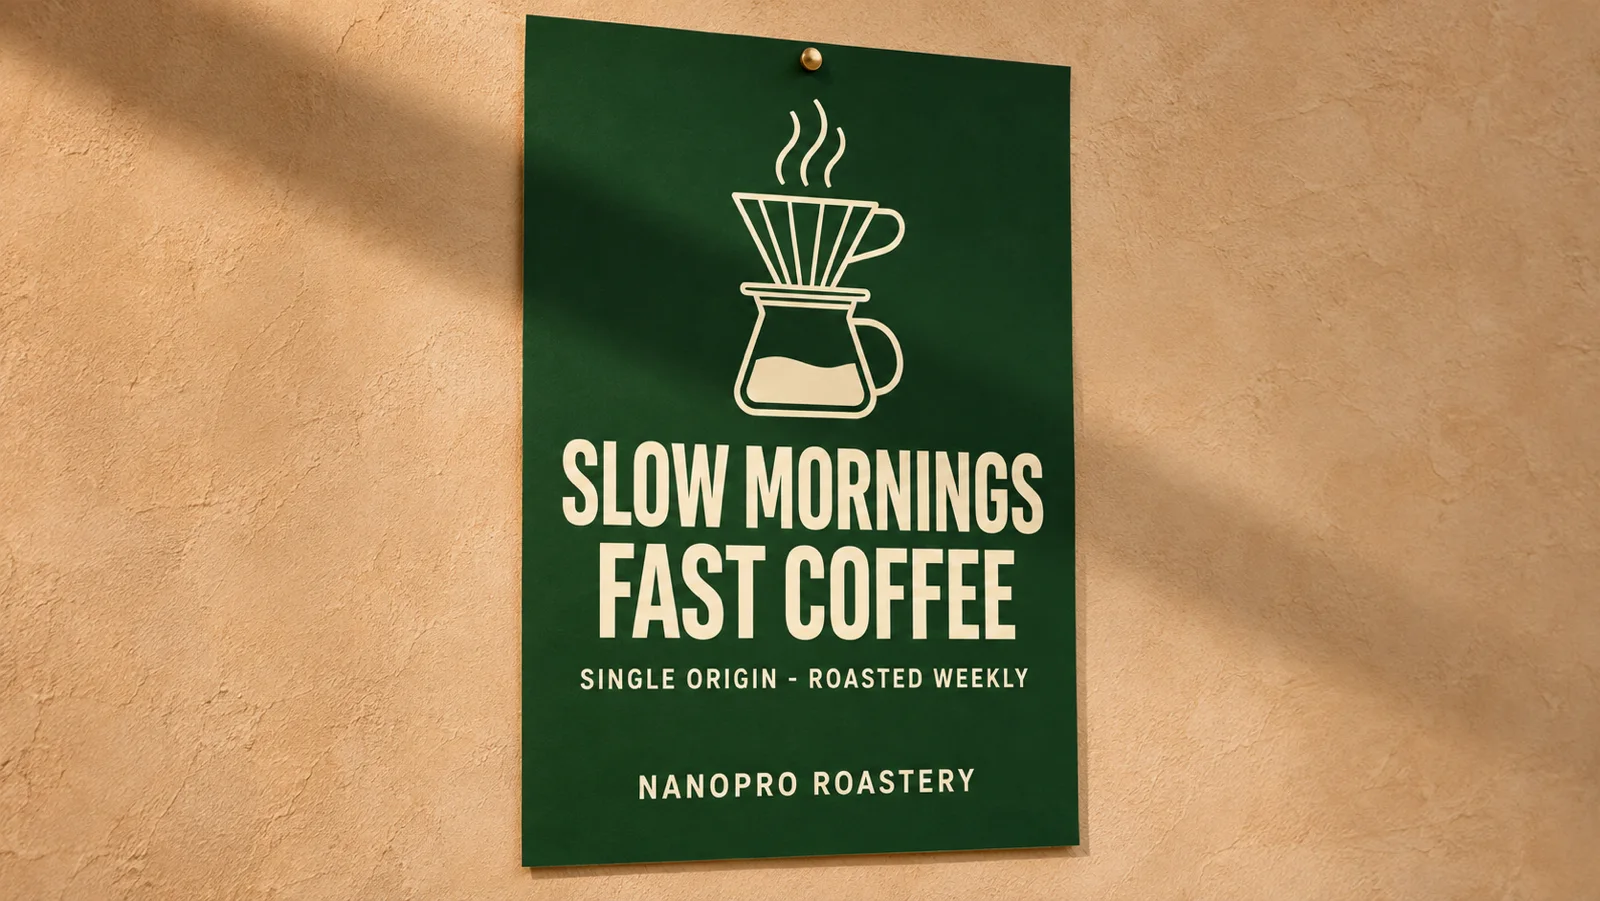
Illustration made for this article with an AI image model, using a fictional roastery so no real brand is involved: a finished poster mockup, deep green field, cream condensed headline, one small secondary line, one brand line. Every word in this caption was specified in the prompt, which is the whole trick.
Give the model the exact words and nothing else to invent. The failure mode is never the text you asked for. It is the text the model adds on its own — an invented shop name on an awning, a price list it decided the scene needed, a decorative flourish with strokes that resolve into nothing. Two reviewers testing Nano Banana Pro and 2 side by side on identical prompts found the same pattern: requested lettering came back correct on both, and the errors clustered in improvised signage. So write the poster copy verbatim, in quotes, one line per line, and add "no other words anywhere".
Design the poster in the prompt, not in your head. Say the field colour, the type weight, the margin size, the alignment. "Deep forest green, cream condensed sans-serif, generous margins, headline left-aligned, small all-caps secondary line" gives the model a layout to hit. "A nice coffee poster" gives it a lottery ticket.
Choose the aspect ratio before the model. A poster is 2:3 or 4:5. Nano Banana 2 also reaches unusual strips — 21:9 banners, 8:1 and 1:8 — which is genuinely useful for web headers and email strips and nearly useless for print. Nano Banana Pro covers the conventional ratios at up to 4K, which is what you want if the poster will actually be printed.
Then finish in a real editor. This is the step people skip. Generative text still breaks on small type, on kerning at small sizes, and on characters outside Latin scripts. Use the model for the composition, the mockup and the texture, and re-set the final headline in Figma or Illustrator if the poster is going to a printer. Nano Pro's own interface language points the same way: proofread, then decide.
Budget it honestly. A 4K Pro render is 80 credits. If you need three poster directions at 4K, that is 240 credits — a fifth of the Starter plan's monthly balance before you have made a single product shot. Explore poster layouts at 1K on the fast model, then render only the winner in Pro.
How to Make a Character That Survives Ten Scenes
Character consistency is the claim that sells these tools and the one that deserves the most suspicion. Image models do not remember. Every render starts fresh. What keeps a face stable is reference conditioning: you hand the model images and it anchors to them while your text changes everything else.
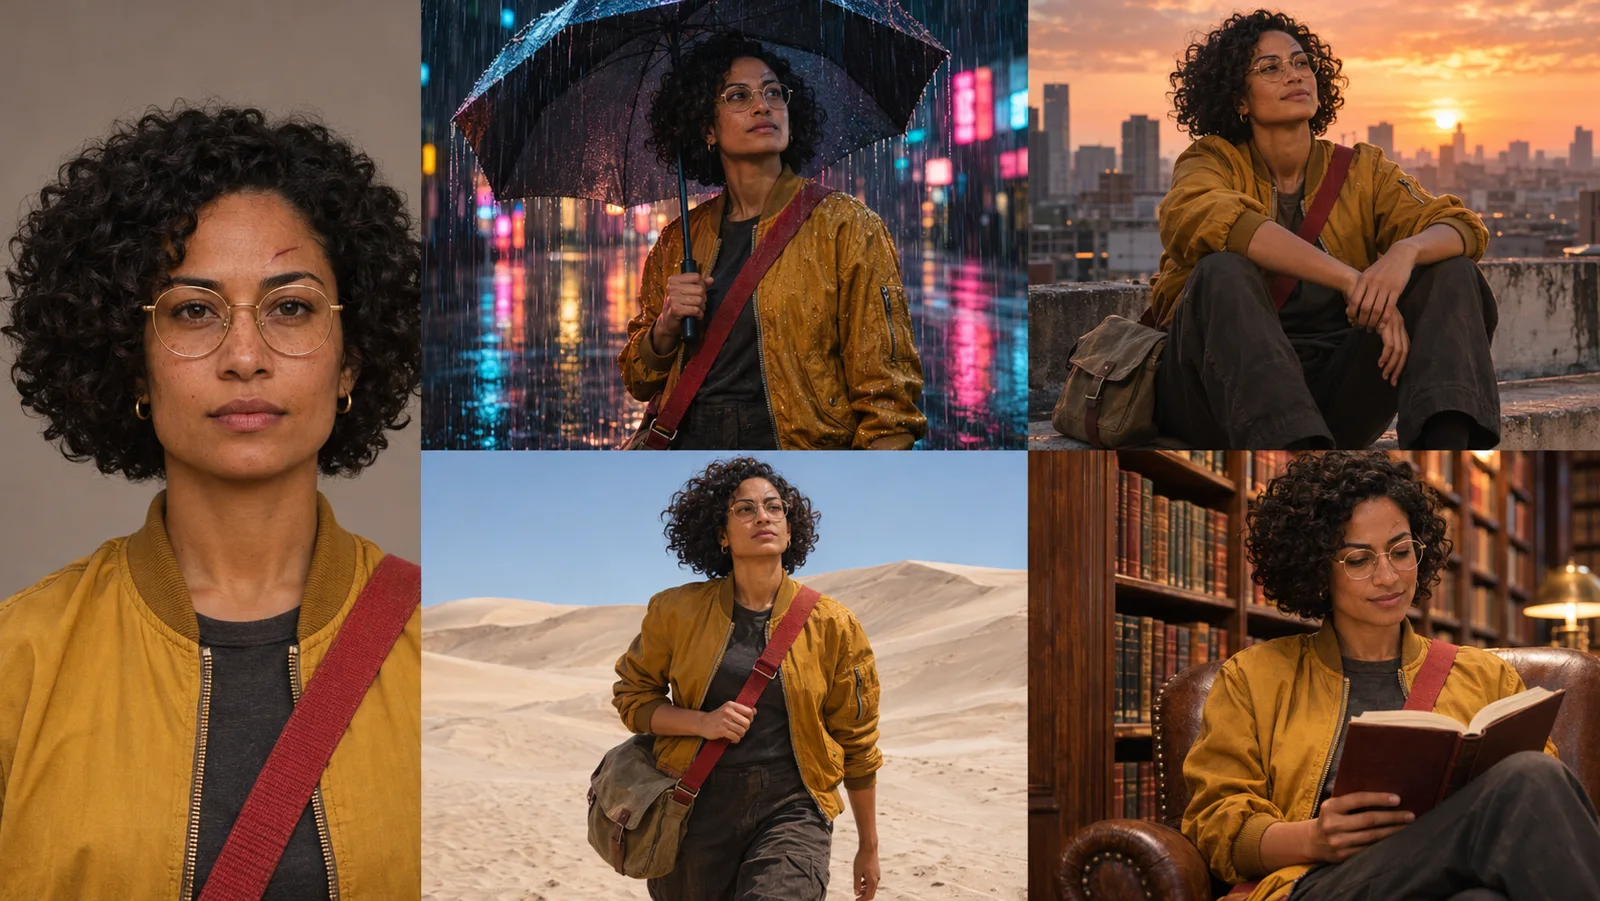
Illustration made for this article with an AI image model: one clean reference on the left, four scene changes on the right. The design brief was that hair, glasses, scar, jacket and bag strap stay identical while location, light, pose and mood change. Note how much easier that is to hold when the character has distinctive fixed props.
Build the reference before you build anything else. Generate one clean, evenly lit, front-facing portrait on a plain background. Add a second and third angle before the head starts turning in your scenes — Google's own guidance for Nano Banana Pro is that two or three angles of the same face help most when the new pose rotates the head. A busy group shot is a weak anchor; a passport-style photo is a strong one.
Write an identity block and never edit it. Age range, face shape, hair texture and cut, eyewear, one scar, one garment colour, one prop. Paste it word for word into every prompt. The moment you paraphrase "mustard bomber jacket" into "yellow jacket", you have given the model a new variable to solve.
Give the character a signature object. This is craft advice, not a prompt trick. The courier in the illustration above is easy to keep consistent because she has gold round glasses and a red bag strap — two high-contrast, low-ambiguity details. Distinctive props are how comic artists have held character recognition for a century, and they work on diffusion models for the same reason: they are cheap to match.
Change one thing per render. Identity stays fixed. Change the action, or the location, or the light. Ask for all four and you will get two of them, usually the first two you mentioned, and a slightly different face. Every practitioner who has written about this model family arrives at the same rule independently.
Promote your best output. When a render nails the character, add it to the reference tray for the next generation. Your reference set improves as the project goes on, which is the opposite of how a written prompt behaves.
Believe the vendor's own limit, not the marketing headline. Nano Pro lists "up to 14 reference images", and Google does cap image inputs at 14. But Google's own reference table splits those 14 into categories rather than handing you 14 character photos: on Nano Banana Pro the budget is roughly six object references, five character references and three style references, and on the Flash-lineage models it is roughly ten objects and four characters. Four clean character angles will beat fourteen mixed ones every time, because a mixed tray makes the model average identities.
On rights, the rule is short. Only upload faces you have permission to use. Nano Pro's interface says this in plain language, and it is not a formality: a model that preserves likeness is a model that can produce a recognisable person in a scene they never stood in.
How to Make One Frame From Three References
The fourth job is the newest and the least discussed: multi-reference composition. You bring a person, a product and a style frame, and ask for one image that contains all three.
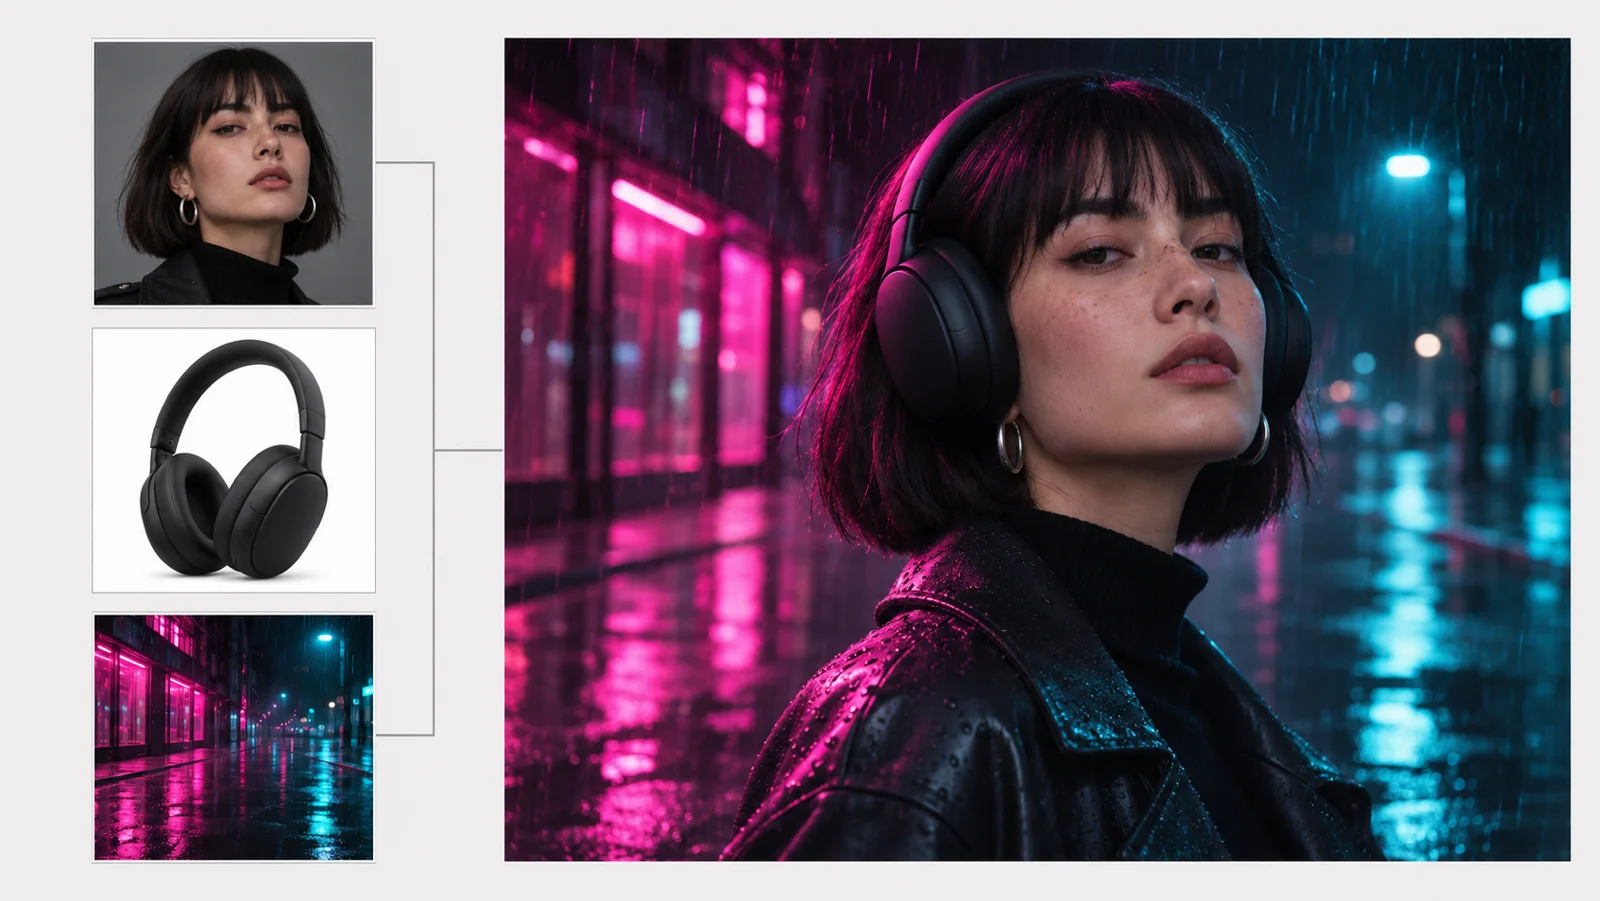
Illustration made for this article with an AI image model: a portrait, a product shot and a style frame on the left, and the merged result on the right. This is the reference-blend pattern, not a screenshot of any tool's interface.
The workflow that works is boringly sequential:
- Label each reference in the prompt. Not "use these images" but "use image 1 for the face, image 2 for the product, image 3 for the lighting and palette". Google's guidance recommends naming each subject or object explicitly so the model can track them.
- Pick one anchor and one decoration. One reference is the thing that must be true — usually the face or the product. The others set style and light. If two references compete for the same role, the model averages them and both get worse.
- Choose Nano Banana 2 for the blend. The base model was not built for many inputs. Nano Banana 2 is the variant sold on reference capacity, and Nano Banana Pro is the one sold on precision. If the frame needs both a specific face and legible text, Pro is the better bet; if it needs four people and ten props, 2 is.
- Accept that lighting is the tell. Merged frames usually fail on light direction, not on identity. Say where the light comes from in the final image, and say that it should match the style reference. A face lit from the left composited into a street lit from the right reads as fake even when the likeness is perfect.
What the Credits Actually Buy
The pricing page is unusually specific, and the specificity is where the real information lives. Per-image costs as listed on November 4, 2026:
| Model | 1K | 2K | 4K |
|---|---|---|---|
| Nano Banana (fast base) | 15 | — | — |
| Nano Banana 2 | 30 | 40 | 60 |
| Nano Banana Pro | 60 | 60 | 80 |
| GPT Image 2.0 | 10 | — | — |
| Seedream 5 Lite / 4.5, Qwen, FLUX 2, Grok, Wan | 15 to 30 | varies | — |
And the plans, shown on the annual view with the launch discount applied:
| Plan | Price per month | Credits per month | Renders at 15 credits | Renders at 80 credits |
|---|---|---|---|---|
| Starter | $9.90 (list $19.80) | 800 | about 53 | 10 |
| Pro | $19.90 (list $39.80) | 2,000 | about 133 | 25 |
| Studio | $44.90 (list $89.80) | 6,000 | 400 | 75 |
Two arithmetic checks are worth doing before you pick a tier, because the headline numbers on the cards do not use the model you probably came for.
The first: the plans advertise "up to 80", "up to 200" and "up to 600" images per month. Divide those into the credit totals and every one of them comes out at 10 credits an image. That is GPT Image 2.0, the cheapest engine in the picker — not Nano Banana. On the model this article is about, 800 credits is 53 fast renders, or ten 4K Pro renders. Read the card, then do the division.
The second: the plan names on the cards do not match the plan names in the column. The Pro tier's card is labelled "Nano Pro Pro Yearly Plan" and the Studio tier's card says "Nano Pro Enterprise Yearly Plan". That is a copy error, not a different product, but it is the kind of detail that tells you the site is moving fast. Confirm the credit total, not the label, before you pay.
The pricing page also lists a Commercial Use License on paid plans, one-off packs from 1,000 credits that do not start a subscription, and a priority queue. The 15 welcome credits expire after 30 days, images made on the free balance carry a small watermark, and paid plans remove it. The launch banner on the homepage runs a countdown and a "spots left" counter; treat both as decoration, not as scarcity.
Where It Still Fails
Any honest guide to this model family has to spend as much space on failure as on capability, because the failures are consistent and predictable.
- Hands and hand-to-hand contact. Across independent side-by-side tests of Pro and 2, the same defect shows up: fused fingers, or a smear where two hands meet over a shared object. Prompt for hands doing something simple, or keep them out of frame.
- Text you did not specify. Requested copy is now usually correct. Improvised copy is usually wrong. Every sign, label and price list the model invents on its own is a spelling risk.
- Precise composition control. "Subject dead centre, top third empty for the headline" is a request the model may ignore. It is not a layout engine. If the frame must be exact, generate the artwork and place the type yourself.
- Whole-frame redraw. Prompt-based editing is not masking. If you ask for a new background, expect the product's reflections and edge shadows to be reinterpreted too. This is also why API-level edits can drift more than interface-level ones — the polished interface is doing segmentation that your text prompt cannot express.
- Skin smoothing. Portraits sometimes come back beautified past realism: pores gone, texture flattened, faces a little plastic. Add "natural skin texture, visible pores, no beauty retouching" and expect to re-roll once.
- Chinese and other non-Latin scripts. Multilingual lettering has improved a great deal and is still the least reliable part of the output. Proofread character by character, or letter in a design tool.
- Identity drift on long projects. The longer the chain of edits, the more the face moves. When it starts to slide, restart from a clean reference rather than trying to prompt it back.
None of this is a reason to skip the tool. It is a reason to price the review step into your workflow, the same way you would price a retoucher.
The Prompt Template Worth Saving
Across all four jobs, the prompts that work share one skeleton. Copy this and change the brackets:
Subject: [exactly what and who, with the fixed details that must survive] Change: [the single thing that is different from the source] Keep: [silhouette, label text, face, garment, crop — name them] Light: [direction, quality, time of day] Camera: [framing, lens feel, depth of field] Palette: [named colours or exact HEX values] Use: [aspect ratio and where the image will live] Text: [the exact words, in quotes, or "no text anywhere"]
The "Keep" line is the one beginners omit and the one that decides whether the render is usable. Generative editors redraw the whole frame; anything you do not protect is up for reinterpretation, politely and confidently.
Frequently Asked Questions
Is Nano Banana the same as Nano Banana Pro?
No. Nano Banana is the nickname for Gemini 2.5 Flash Image, the fast original. Nano Banana Pro is Gemini 3 Pro Image, a reasoning model with cleaner multilingual text, finer detail and 4K output. Nano Banana 2 is Gemini 3.1 Flash Image, which brings most Pro-level behaviour back to Flash speed.
Do I need an API key to use Nano Banana AI on Nano Pro?
No. Nano Pro is a credit-based web workspace, so there is no Google Cloud project, API key or billing account to configure. You sign up, spend the welcome credits, and buy a plan or a pack when you need more. The trade-off is that you are one step removed from the model version, which is why the footer states that the service is independent of Google.
Can the Nano Banana AI photo editor change a background without changing the product?
Usually, with caveats. Upload a sharp, evenly lit product photo, describe only the new scene, and explicitly list the shape, label and colour that must stay. Then compare at full size, because reflections and edge shadows are where the redraw shows. Nano Pro's own copy is careful here: it promises the product keeps its shape and label while light, set and mood are rebuilt, which is a claim about intent, not a pixel guarantee.
How many reference images can I actually use?
The cap is 14 images, but Google's documentation splits that budget by type — roughly six objects, five characters and three style references on Pro, and about ten objects plus four characters on the Flash-lineage models. Four clean character photos outperform fourteen mixed ones.
Are the images watermark-free and commercially usable?
Paid plans remove the watermark, and plans that list a Commercial Use License cover business work such as ads, listings and client projects. Free-tier renders carry a small watermark. You remain responsible for the rights to anything you upload, and for any claim your image makes about a real product.
How much should I budget for a month of work?
Count finished images, not attempts. If you need 20 finals a month at 4K on Pro, that is 1,600 credits — the Pro plan, with room for drafts. If you mostly need social-sized edits, 800 credits on Starter covers about 53 fast renders. Draft at 1K, finish at 4K, and the arithmetic stops being scary.
The Bottom Line
The five keywords describe one thing: an editing-first image model family that is very good at holding a subject still while everything around it changes. The skill is not in finding the tool. It is in writing a brief that names the change and protects the subject, choosing the cheapest model that can carry the frame, and inspecting the result like a client rather than like a fan.
Start with one photo you already own — a packshot, a poster layout, a portrait — and run it through the whole loop once at 1K before you spend anything at 4K. If the workflow holds, the showcases are a reasonable place to lift prompt structures from, since each example names what was fixed and what was free to change. If the workflow does not hold on your material, you have learned that for 15 credits instead of 80, which is the cheapest lesson on the page.