
Five phrases send people to the same search box, and only one of them is a product. Krea 3 AI is a model name. Krea 3 AI Image Editor is what most people actually want when they type it. Krea 3 Image Generator is the text-to-image side of the same wish. AI Photo Editor and AI Image to Image Generator are the generic category names that the first three keep getting mixed into. If you buy the wrong one, you do not get a worse picture. You get a different product, a different price, and a different set of limits.
This is the how-to for the workflow, written against Krea 3 at krea3.pro, a browser workspace that runs several third-party image models behind one prompt bar. We will untangle the five phrases, then make three things that people actually need: a product photo that survives a relight without losing its label, a face that stays the same person across a series, and a multi-reference frame built from pieces that were never photographed together. Then we will do the part that decides whether any of it ships: how to brief an instruction-driven editor so the model changes one thing instead of redrawing everything.
Quick answer: krea3.pro is an independent AI photo editor and AI image to image generator. It is not Krea AI and it does not serve Krea's own Krea 3 weights. Edits run on GPT Image 2, Nano Banana Pro, Nano Banana 2, Nano Banana, Seedream 5 Lite, Seedream 4.5, Grok Imagine, Wan 2.7 Image and Qwen Image 2, at 10 to 80 credits per image depending on model and resolution. New accounts get 15 free credits valid for 30 days, plus a daily check-in of 20 credits. The workflow is four steps: upload, describe the change, pick a model, keep or refine. The skill is in step two.
A note on sources: we read the krea3.pro homepage, pricing page, About page, showcase page, blog index and terms of service, plus Krea AI's own October 15, 2026 release post for the model also called Krea 3, on November 6, 2026. We did not buy credits and did not run a paid edit, so every statement about how the editor behaves is either the site's own description or a general property of the model families it names. Credit prices and available models change; the number next to the Generate button is the one that matters. Our editorial policy explains how we treat vendor claims we have not reproduced.
First, Separate the Five Keywords
The naming collision here is not cosmetic. Two different companies, one shared model name, and a search result page that mixes them. Getting it straight saves money before you spend any.
| Phrase people search | What is actually behind it | Where to get it |
|---|---|---|
| Krea 3 AI | Krea AI's image editing model. Krea's release post describes edits returning in under 8 seconds at native 2K, up to 6 reference images per edit, priced at $0.06 per 2K image. | krea.ai, plus fal, Replicate, OpenRouter, Together AI, Hedra and Nous Research |
| Krea 3 AI Image Editor | Either Krea AI's own Edit tool, or an independent editor like krea3.pro that borrows the keyword. The domain in the address bar is the only reliable signal. | Depends on the host you land on |
| Krea 3 Image Generator | Not a separate product anywhere. Text-to-image is a mode inside whichever workspace you opened. | Same |
| AI Photo Editor | The category. Covers one-click fixes, prompt-based whole-image rewrites, and mask-based inpainting, which are three different jobs. | Many vendors |
| AI Image to Image Generator | The category's technical name. You supply a source image and an instruction; the model denoises toward an edited version instead of starting from noise. | Many vendors |
krea3.pro is unusually direct about this. Its FAQ says plainly that Krea 3 is the model Krea AI revealed on 28 August 2026, that the site is a separate and independent workspace with no link to Krea AI, and that it does not serve Krea's own weights. The About page repeats it, and the footer of the homepage carries the same disclaimer. That honesty is worth something: it means you can read the rest of the site as a description of what it does rather than a claim about whose model it is.
The two claims are also not in conflict. Krea AI's own post puts the Krea 3 release on October 15, 2026 and describes it as an editing-first model built around leaving untouched what you did not ask it to touch. krea3.pro describes the earlier reveal in August, when the model was shown but not generally available. Revealed in August, released in October, resold under the same keyword by an independent editor in November: three dates, one name.
The practical consequence is simple. If you want Krea's own model with its own weights, its own 8-second edits and its own licensing terms, go to krea.ai. If you want a multi-model workspace where you can put the same prompt through GPT Image 2 and Nano Banana Pro and see which one holds your product better, that is a different purchase, and that is what the rest of this article covers.
What the Krea 3 AI Image Editor Actually Does
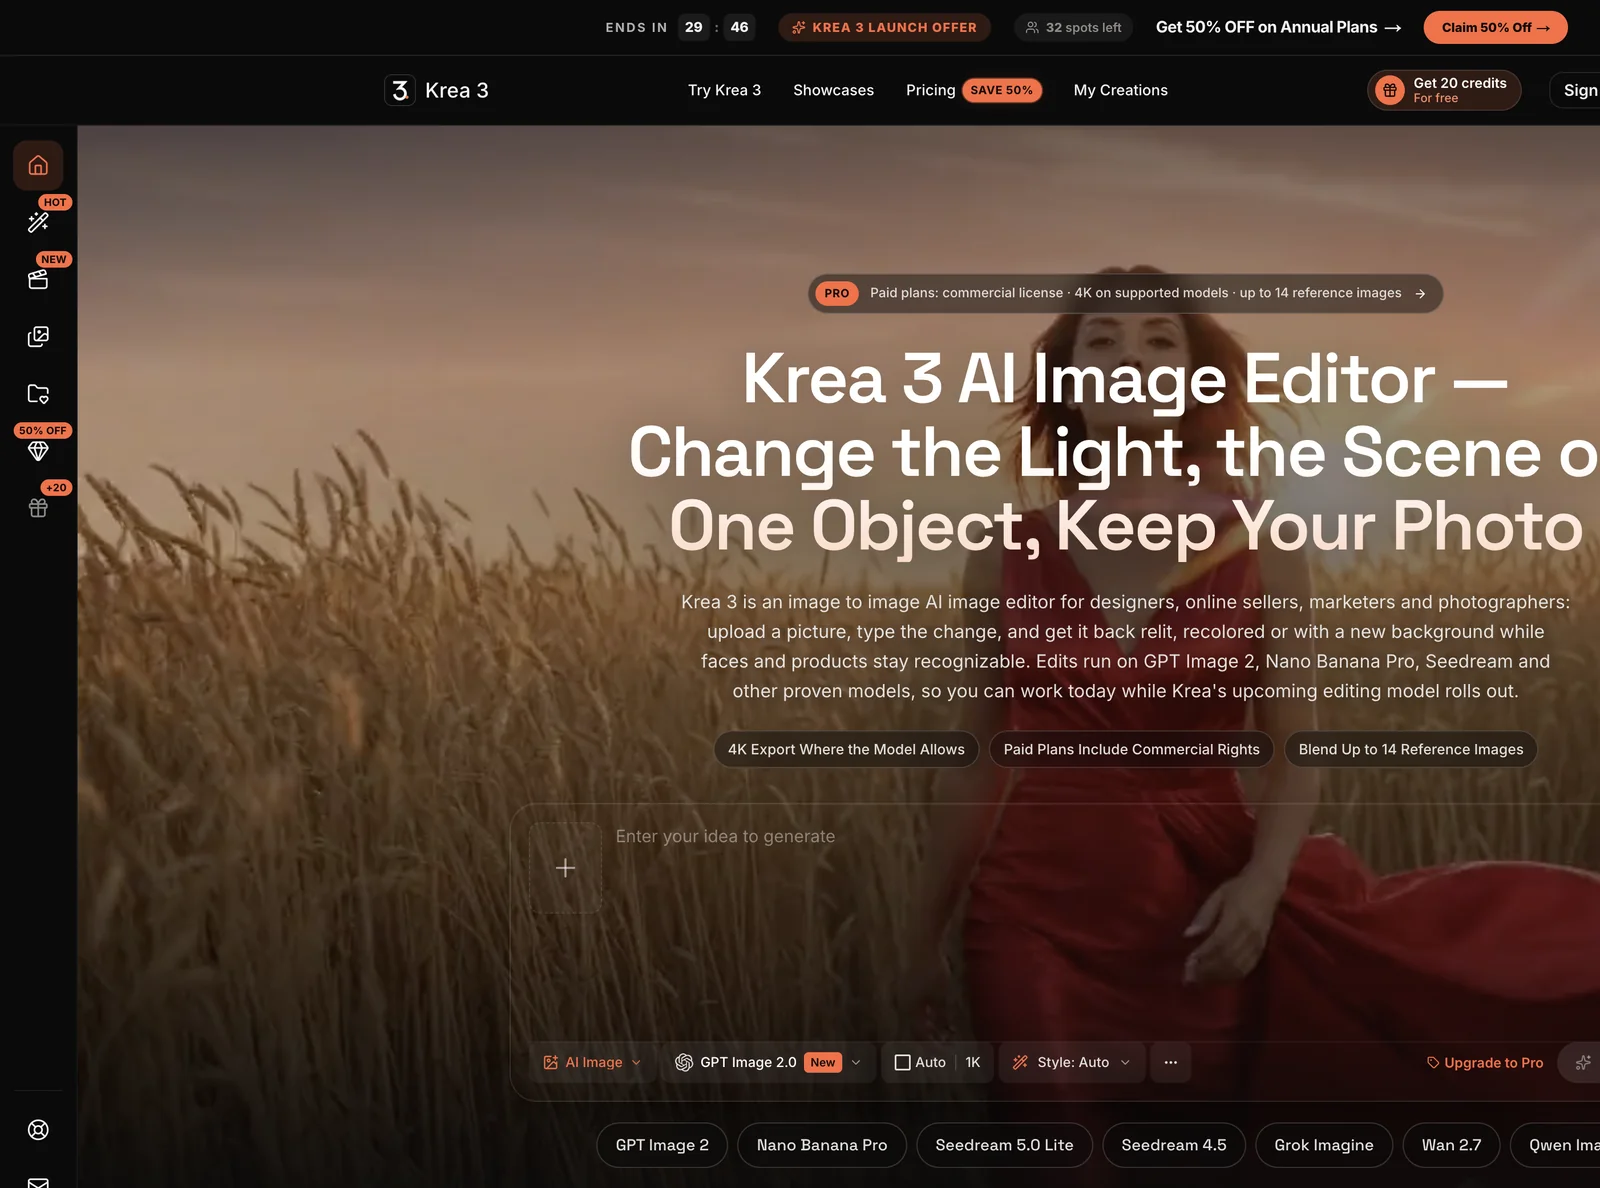
Screenshot of krea3.pro, taken November 6, 2026. The prompt bar sits above a row of model pills: GPT Image 2, Nano Banana Pro, Seedream 5.0 Lite, Seedream 4.5, Grok Imagine, Wan 2.7 and Qwen Image 2. The resolution selector reads 1K, and the Generate button carries a visible credit price.
The interface makes one structural decision that shapes everything else: image-to-image is the default mode, not the second tab. The prompt box has an upload affordance directly attached, and the site's own headline says the product is for "photos you already like". That is a different design philosophy from a text-to-image toy, where the empty canvas is the point.
The four-step loop the site documents is:
- Upload a photo. JPG, PNG or WebP. A product shot, a portrait, a room.
- Describe the change. Written the way you would brief a retoucher, not the way you would describe a dream. The site's own examples are "warmer light", "a marble counter", "a navy jacket".
- Pick a model and generate. The credit cost appears before you press the button, which matters more than it sounds once you start comparing models on the same prompt.
- Download or keep editing. The result can go back in as the next round's reference. Every run lands in My Creations with its model, aspect ratio and resolution recorded.
Three details in that loop are worth pulling out, because they are where most people lose quality.
The result is stored with its settings. Reusing a prompt three weeks later is normally a guessing game. Having the model name, ratio and resolution attached to each past render turns your library into a record of what worked, which is the only reliable way to build a house style.
The credit price is visible before the run. A workspace that hides cost until after generation trains you to render at the highest setting and hope. One that shows the number trains you to draft cheap and finish expensive, which is the correct habit.
Re-uploading the output as a reference is a supported loop, not a workaround. This is how you do multi-pass editing without a mask: fix the composition first at low resolution, then feed the keeper back in and fix the light. It is also how drift accumulates, which the last section of this guide deals with.
How to Make a Product Photo Survive a Relight
This is the highest-value edit on the list, and the one where AI most often quietly lies about your product. A packshot on a white sweep, relit into a warm lifestyle scene, can replace a studio day. The same edit can also move a label two millimetres and turn a listing into a compliance problem.
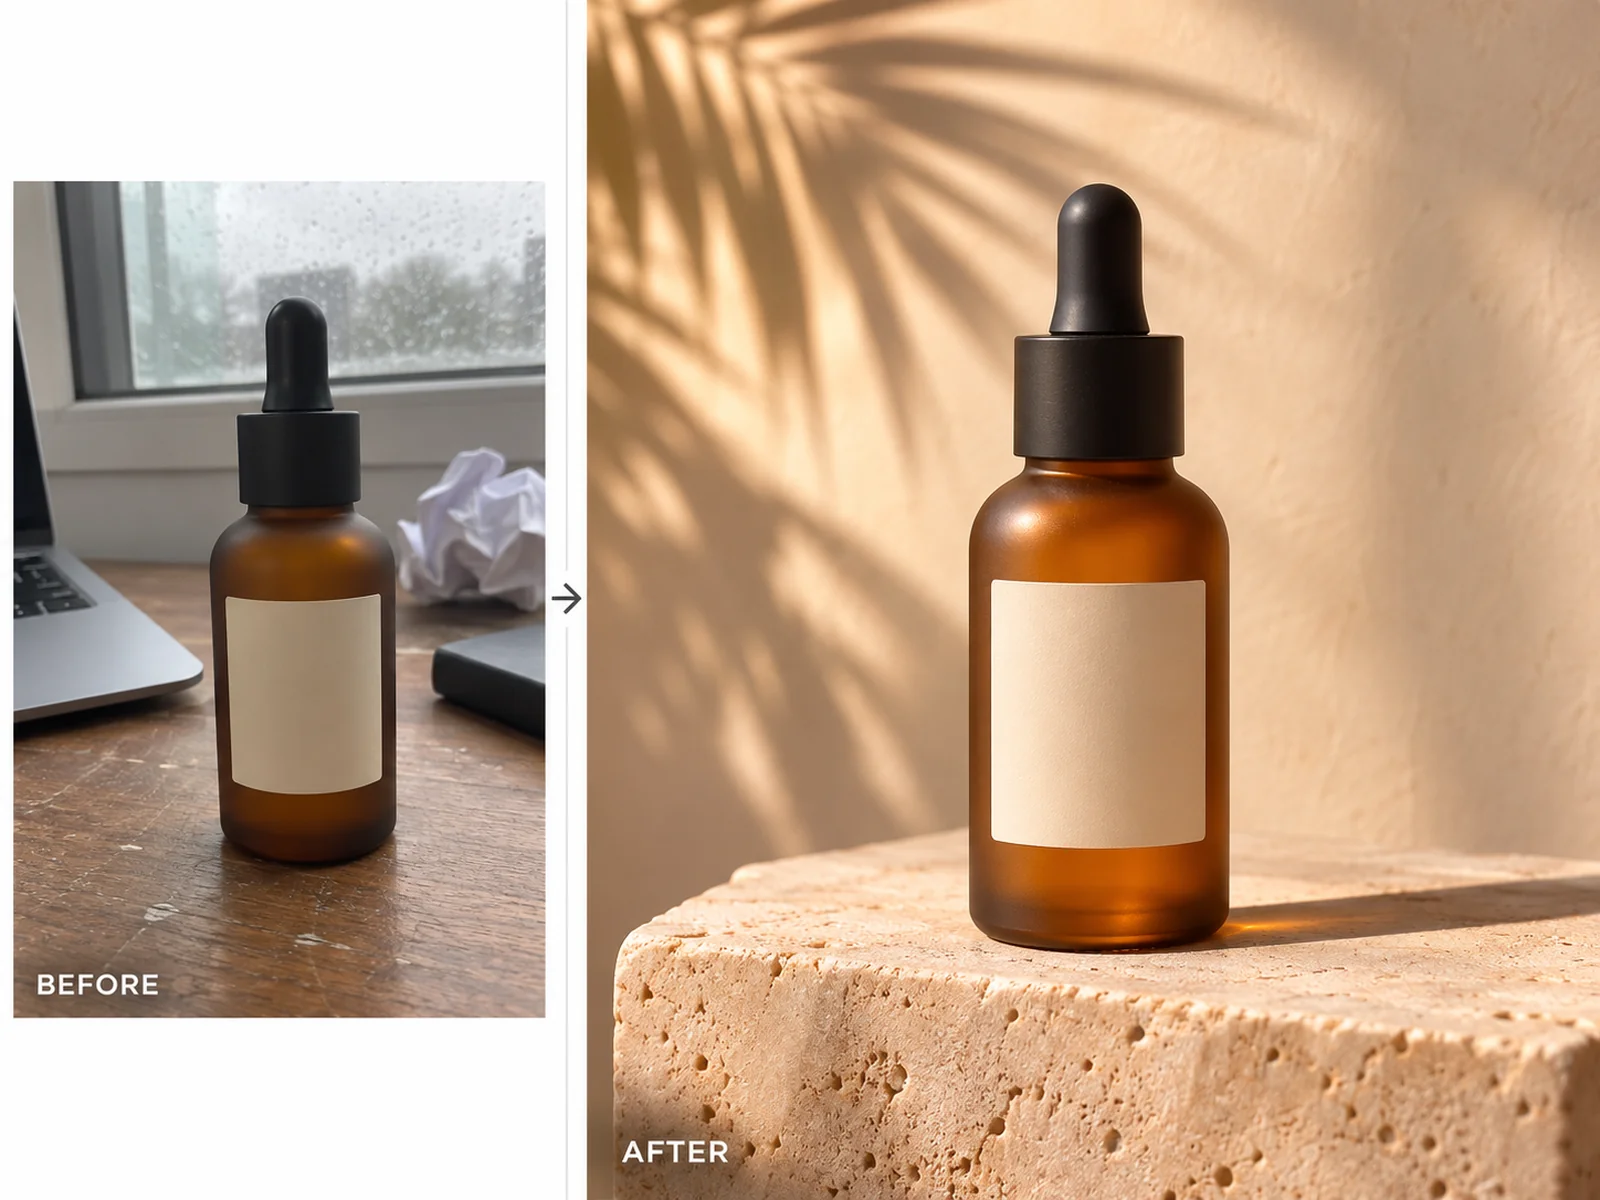
Illustration made for this article with an AI image model, not a render bought from krea3.pro: one ordinary desk snapshot on the left, one relit studio-grade scene on the right. The bottle silhouette, cap and label rectangle are meant to stay fixed while only the surface, light and setting change. That split is exactly what the prompt below has to name.
Write the brief as three sentences, not one wish
The prompt that fails is a wish: "make it look professional". The model has no idea which part of the word "professional" is a surface, which is a light, and which is a lens. The prompt that works has three parts, in this order:
- What must not move. Name it physically. "Keep the bottle exactly as photographed: same amber glass, same black dropper cap, same label rectangle in the same position and the same size."
- What changes. One change per run, described with materials and direction. "Replace the background with a pale travertine block and a plaster wall. Low afternoon sun from the left, long soft shadows, a faint palm-leaf shadow on the wall."
- What it is for. The output format and the finish. "Editorial skincare campaign, shallow depth of field, 85mm feel, 4:5 for a product carousel."
That third sentence is not decoration. Telling the model the deliverable changes how it frames, how much empty space it leaves, and how hard it pushes contrast. A prompt written for a marketplace thumbnail and a prompt written for a magazine spread should not produce the same image.
Change one variable per run
The first generation is a draft, not a decision. Run it at 1K. If the surface is wrong, change the surface and leave the light alone. If the light is wrong, change the light and leave the surface. Two variables at once means you cannot tell which one fixed it, and you will spend the savings from 1K on reruns at 2K.
Only when the composition is right do you re-run the keeper at the highest resolution the chosen model supports. The site lists 4K export on GPT Image 2, Nano Banana Pro, Nano Banana 2 and Wan 2.7 Image, and 1K, 2K or 4K output generally. That ladder is the whole cost strategy: explore cheap, finish once.
Compare against the original, in a fixed order
Put the result next to the source at full size and check four things in this order: label text, cap threads and seams, silhouette, then reflections on glass. Text is where these models still slip, and reflections are where a relight most often gives itself away. If any of the four moved, the image is a campaign asset, not a listing image.
That distinction is worth stating plainly. A generated scene is fine for a hero banner, a secondary listing photo or a seasonal variant. It is the wrong tool for a marketplace main image that is required to show the actual product, and it is the wrong tool for anything where the label carries a regulated claim. An AI that "improves" your packaging has created a legal problem disguised as a marketing asset.
How to Keep One Face Across a Series
Character consistency is the hardest promise in this category, because image models do not remember anything. Every generation starts from zero. Written descriptions produce a slightly different face each time; the drift is small per image and obvious across ten.
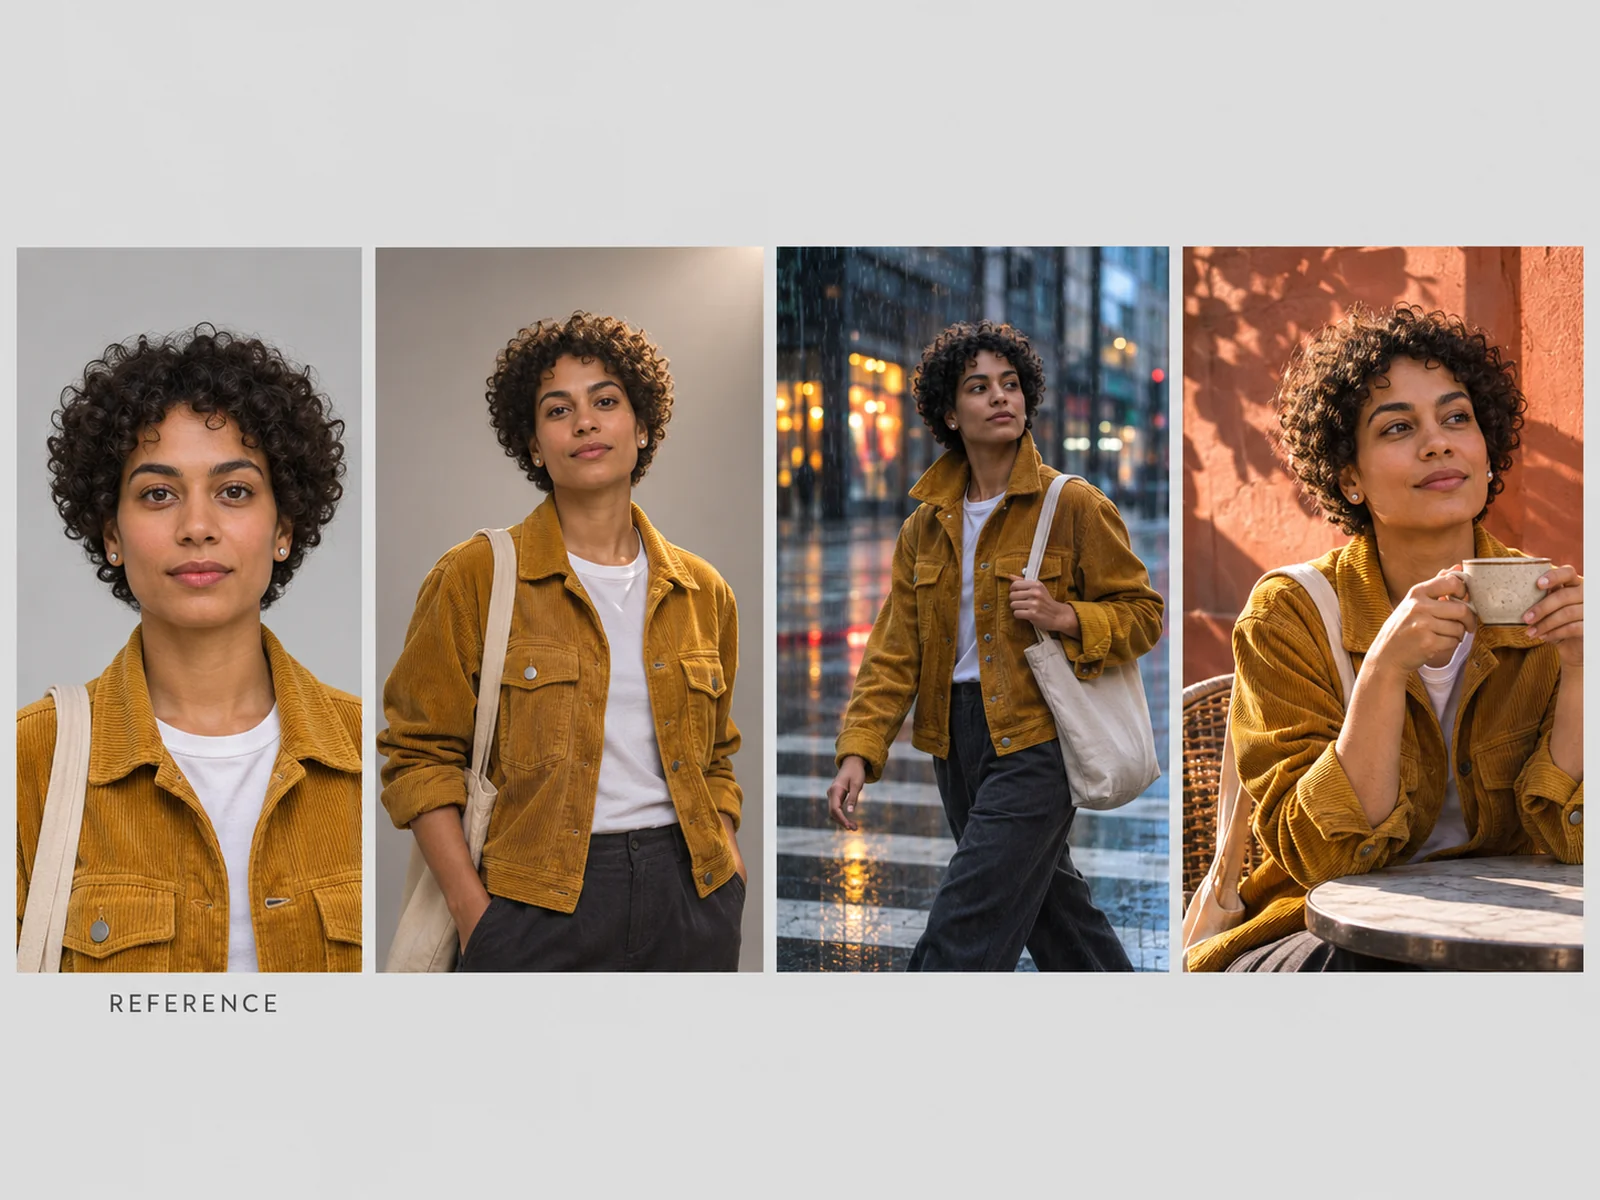
Illustration made for this article with an AI image model: one reference card and three scenes built from it. Hair shape, jacket, earrings and bag stay fixed while setting, pose and light change. The person is fictional. This is the output pattern the workflow below aims at, not a screenshot of krea3.pro.
The mechanism that makes it work is reference conditioning: you attach images, and the model uses them as a visual anchor alongside the text. krea3.pro's homepage advertises blending up to 14 reference images and lists several models that accept multiple references in one request, including Nano Banana 2, Seedream and Wan 2.7 Image. For comparison, Krea AI's own Krea 3 model takes up to 6 per edit. More slots is not automatically better; a handful of clean, consistent references beats a pile of mixed ones.
The four rules that actually hold a face
- Write an identity block once, then never edit it. Age range, face shape, hair texture and colour, one signature garment, one accessory. Paste it verbatim into every prompt. Rewriting the description from memory each time is how a series ends up with five cousins.
- Build the reference from a clean frame. A front view and a three-quarter view, plain background, even light, face fully visible. Group scenes make weak anchors because the model cannot tell which person it is supposed to hold.
- Change setting, not identity. Each new image changes the room, the light, the pose or the framing — one of those, not all four. "Same person, same jacket, in a rainy crosswalk at dusk, three-quarter body, cool ambient light."
- Promote your best output. When a render nails the character, add it to the reference set for the next run. The reference set is a living thing and it should get stronger as the project goes on.
There is a fifth rule that most guides skip: simplify when drift appears. If the face starts changing, do not add more references. Reduce the scene. Fewer people, plainer background, closer framing. Then build complexity back one step at a time. Reference-conditioned editing degrades gracefully under simplification and badly under more instructions.
Be honest about the ceiling, too. No reference-based tool guarantees an identical face, body, costume and accessory set across hundreds of frames without human review. The site's own copy frames reference images as guidance rather than a locked identity, and that is the right expectation to hold going in.
How to Use the Krea 3 Image Generator Without Wasting Credits
The text-to-image side is the same prompt bar with nothing uploaded. What changes is the decision that matters most: which model.
| Model | Credit cost per image | Where it tends to be the right pick |
|---|---|---|
| GPT Image 2 | 10 | Layouts, signage and anything with lettering in the frame. The cheapest option in the menu and the strongest at typography. |
| Nano Banana | 15 | Fast everyday tweaks where you do not need a hero file. |
| Nano Banana 2 | 30 to 60 | Multi-reference work and unusual aspect ratios. Rises with resolution. |
| Nano Banana Pro | 60 to 80 | Clean lettering and fine detail at high resolution. The most expensive stamp in the menu. |
| Seedream 5 Lite | 20 | Jobs that lean on several reference pictures at once. |
| Seedream 4.5 | 25 | A polished, high-detail commercial default with a strong sense of its own aesthetic. |
| Grok Imagine | 15 | A different look from the same prompt. Useful for a second opinion. |
| Qwen Image 2 | 20 | Alternative rendering style, mid-price. |
| Wan 2.7 Image | 20 to 80 | Several variations returned in one run — up to four images — which is the cheapest way to shop for a direction. |
Two habits follow from that table.
Route by job, not by price list. A poster with a headline inside the pixels goes to GPT Image 2 at 10 credits, not to Nano Banana Pro at 80. A final hero frame with a legible label goes to Nano Banana Pro. Shopping for four directions goes to Wan 2.7 Image, because four candidates from one run beats four separate runs of one candidate.
Compare models on an identical prompt before you commit. This is the single advantage a multi-model workspace has over a single-model site, and almost nobody uses it. Run the same prompt on two engines at 1K, put the results side by side, and note which one held your product and which one invented a nicer bottle. Then use that engine for the rest of the project.
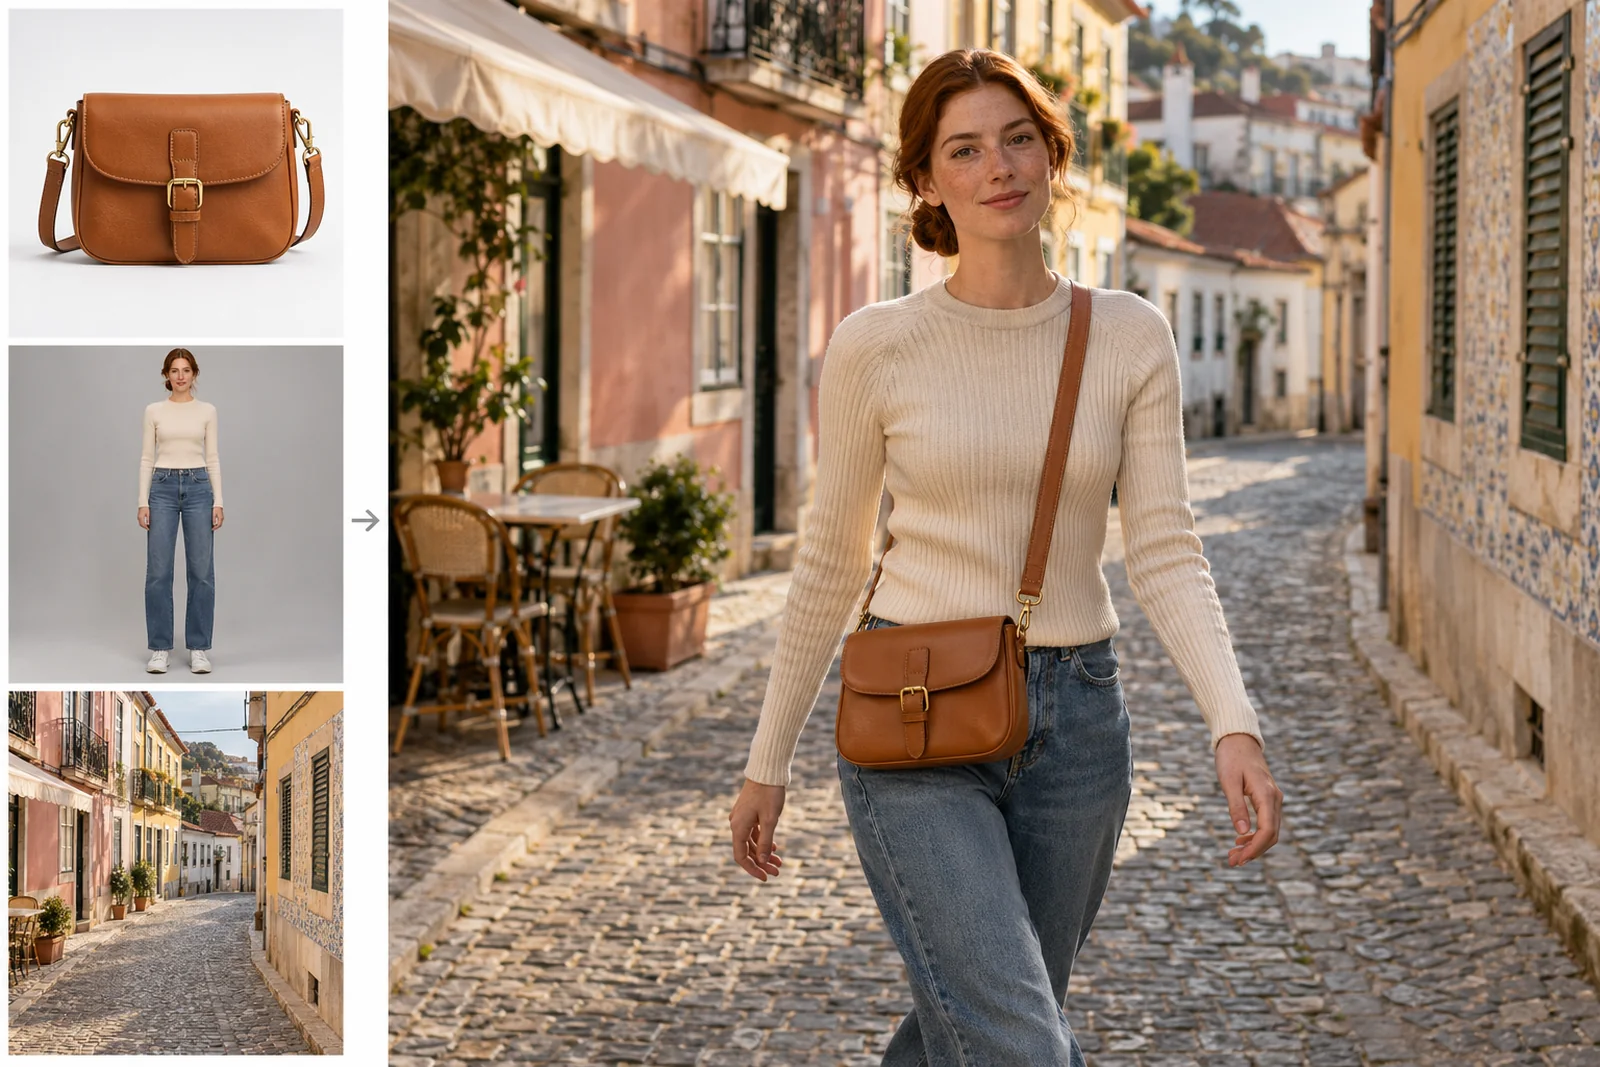
Illustration made for this article with an AI image model: a product cut-out, a model shot and a location shot on the left, one merged frame on the right with unified light and a believable cast shadow. This is the multi-reference pattern, and it is the one that fails most quietly — a bag that looks right in isolation can sit wrong on a shoulder.
Assign a role to every reference
The mistake with multi-reference work is uploading three images and hoping. Each reference needs a job, named in the prompt: "the bag from image 1, the model from image 2, the street from image 3". Without that mapping the model decides for itself, and it will happily put the street's colour grade on the bag.
Then check the joins, not the whole. A merged frame usually passes at a glance and fails at four points: the contact shadow where the object meets the body, the strap's perspective, the direction of the light on the subject versus the background, and the edge of the cut-out where the background bleeds. Fix those and the frame becomes usable.
How to Brief an AI Image to Image Generator So It Only Changes What You Named
This is the section that decides whether your credits produce assets or souvenirs.
Under the hood, an instruction-driven editor does not paint. It encodes your image, adds a controlled amount of noise, and denoises back toward a clean image under the guidance of your text. The model decides which regions to touch and how hard, based on what you said. That single fact explains every failure mode: anything you did not explicitly protect is available for reinterpretation.
Mask-based tools hand you two levers, a mask for where and a strength for how much. Instruction editors hide both. You get one lever instead: the specificity of your sentence. So the sentence has to do the work of both.
The five-part edit prompt
- The operation. One verb, named. Replace, remove, recolour, relight, extend, restyle. Not two.
- The target. What exactly, where exactly. "The cushion on the left of the sofa", not "the furniture".
- The new state. Materials, colours, direction of light, time of day. Concrete nouns beat adjectives every time: "green marble with veining running along the length" beats "luxurious".
- The preserve list. Everything that must not move, named physically. Pose, crop, hands, face, garment shape, label position, window frames, shadow direction.
- The deliverable. Aspect ratio, resolution and use. "1:1 for a marketplace listing" is different instruction from "16:9 for a banner".
A prompt built this way reads like a brief to a retoucher, which is exactly what the site's own wording asks for. A prompt that ignores part four reads like a wish, and produces a redrawn image that is beautiful and useless.
Iterate from the original, not from the last result
This is the counter-intuitive one. Feeding the last output back in feels efficient and compounds error: each pass reinterprets the previous interpretation, so a small drift in pass one becomes a different product by pass three. Start each new direction from the untouched source. Only chain passes when you are deliberately building on a keeper — for example, fixing composition first, then relighting that exact result.
Check at 100 percent, and check the boring things
Zoom in. Look at straight lines: window frames, shelves, table edges. Look at small objects and where they meet the surface. Look at hands. Look at any text. Generative editors are excellent at the thing you asked for and unpredictable at the things you did not mention, and "did not mention" is a very long list.
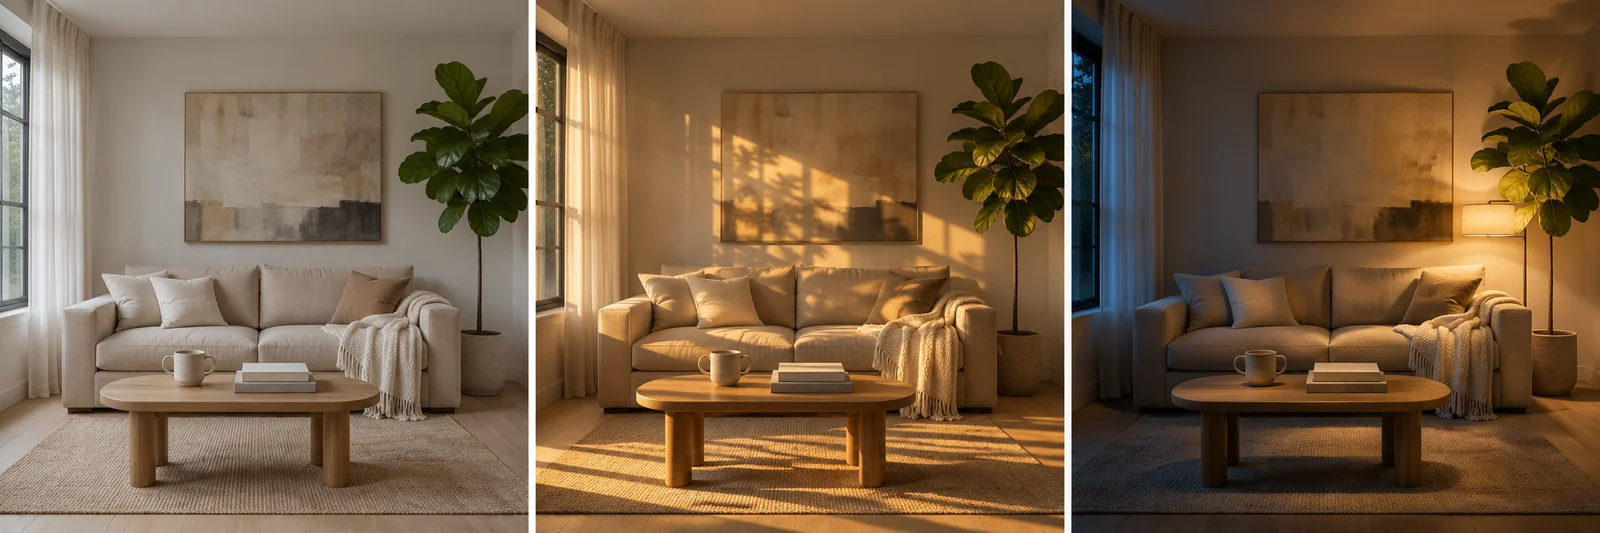
Illustration made for this article with an AI image model: one room, four treatments, same windows and floor direction throughout. Interior staging is the clearest demonstration of the preserve list — if the architecture moves, the image is worthless no matter how good the sofa looks.
Interior staging shows why the preserve list matters more than the creative brief. A rendered room with a beautiful sofa and a window that has changed shape is not a staging visual, it is a fantasy. Name the architecture first — "keep the window positions, the radiator and the floor direction exactly as they are" — then describe the furniture.
What the Credits Actually Buy
krea3.pro sells monthly and annual plans plus one-time packs, and the maths is easy to get wrong because the headline number counts images at the cheapest model.
On November 6, 2026, the annual plans were advertised at 50 percent off:
| Plan | Annual price per month | Credits per year | Credits per month | Listed images per month |
|---|---|---|---|---|
| Starter | $9.90 | 9,600 | 800 | Up to 80 |
| Pro | $19.90 | 24,000 | 2,000 | Up to 200 |
| Studio | $44.90 | 72,000 | 6,000 | Up to 600 |
| Max | $89.90 | 168,000 | 14,000 | Up to 1,400 |
Read the image count as a 10-credit figure, because that is GPT Image 2 at 1K. If your work needs Nano Banana Pro at 4K, the same balance buys roughly an eighth as many finished frames. The site's own cost-per-100-credits line is the more honest comparison: $1.24 on Starter, $1.00 on Pro, $0.75 on Studio, $0.64 on Max.
The one-time packs start at $29.90 for 1,000 credits and run to $999.90 for 70,000, and the site states they stay valid for ten years. Plan credits behave differently: unused allowance lapses when the billing period rolls over. If your editing is bursty — a catalog refresh in March, nothing until September — a pack is the better shape of purchase. If you edit every week, a plan is cheaper per credit.
Two mechanics are worth knowing before you spend anything. Credits are reserved when you press Generate and returned automatically if the provider errors out or never delivers an image. And paid plans carry commercial-use rights, with the caveat in the terms that you are still responsible for having the rights to whatever you upload.
Where This Workflow Stops Working
Three honest limits.
It is not a mask editor. There is no brush, no layer, no feathered selection. If you need to change one word on a packaging label without touching a single other pixel, a classical editor or a mask-based fill will beat any instruction-driven model, and it is not close.
Precision is a request, not a guarantee. Whole-image rewriting means sub-pixel intent is aspirational. Plan your quality checks around that instead of being surprised by it.
Model availability moves. This is a workspace built on other companies' APIs. When an upstream provider renames or retires a model, the menu changes. That is a reasonable trade for a designer or a small seller who does not want an API key and a billing project. It is a bad trade if your pipeline needs a pinned model version with a contract behind it.
Frequently Asked Questions
Is krea3.pro the official Krea 3?
No. The site says so itself, in its FAQ, its About page and its footer. It is an independent workspace and it does not serve Krea AI's own model weights. Krea AI's own Krea 3 is available at krea.ai and through partners including fal, Replicate and OpenRouter.
Which models does the Krea 3 AI Image Editor run?
GPT Image 2, Nano Banana Pro, Nano Banana 2, Nano Banana, Seedream 5 Lite, Seedream 4.5, Grok Imagine, Wan 2.7 Image and Qwen Image 2, all selectable from one menu. The site says it will evaluate adding Krea's own editing model if it becomes available to third parties, without promising a date.
How much does one edit cost?
Between 10 and 80 credits depending on model and output resolution. GPT Image 2 is 10, Nano Banana is 15, Seedream 5 Lite is 20, Seedream 4.5 is 25, Qwen Image 2 is 20, Grok Imagine is 15, Nano Banana 2 is 30 to 60, Nano Banana Pro is 60 to 80, and Wan 2.7 Image spans 20 to 80. The price is shown next to the Generate button before you run it.
Can I use the results commercially?
Paid plans and the larger credit packs include commercial-use rights, and paid exports carry no watermark. Rights to what you upload are yours to secure, and product images that misrepresent the real product remain a problem no license solves.
How many reference images can I attach?
The homepage advertises blending up to 14 reference images, and lists Nano Banana 2, Seedream and Wan 2.7 Image among the models that accept several in one request. Limits differ by model, so check the selector before you plan a multi-reference job. In practice, three to five well-chosen references outperform fourteen mixed ones.
Will it relight a photo or colorize a black-and-white print?
Yes, through the prompt. Describe the light by direction, warmth or time of day, or ask for natural colour on a scanned monochrome print and name a few hues. Quality varies by model, so compare two outputs before you keep one.
The Bottom Line
The five keywords lead to three different purchases, and the address bar is the only reliable way to tell them apart. If you want Krea's own model, go to krea.ai. If you want a workspace where an instruction-driven editor and a text-to-image generator share one credit balance and one library, and where you can put the same prompt through several engines to see which one holds your product, Krea 3 at krea3.pro is built for exactly that.
Whatever you use, the workflow that produces shippable images is the same: protect what must not move, change one thing per run, explore cheap and finish once, and check the boring details at 100 percent before anything leaves your machine. Start with the showcases to see which edits match your work, then read the pricing page and size the balance to a real week rather than a best case. Fifteen free credits is a test, not a rehearsal — spend the first three on the cheapest model and learn what your own photos do under instruction before you pay for a final render.
As a team that spends most of its time on AI video generation, we keep hitting the same lesson in images that we hit in motion: the model is not the workflow, and the workflow is what decides whether the output is usable.